Windows Security Center monitors the security and integrity status of your PC and notifies you if any actions are needed to remedy cybersecurity issues, device performance issues, or other vulnerabilities. Most of the time, when the Windows Security Center reports Bitdefender Antivirus and/or Bitdefender Firewall are turned off, it is likely just a display issue. In other words, although Bitdefender is working correctly and is protecting your PC, Action Center shows the opposite because Windows fails to check your computer’s real status. There are a few measures you should take to check if the notifications are genuine and to stop Windows from reporting that Bitdefender security features are disabled:
- Use Windows Action Center to activate the Bitdefender modules indicated as being off.
- Make sure the Antivirus and the Firewall modules are turned on in the Bitdefender interface.
- Reset the Windows Security Center check list to ensure it is not a malfunction that causes false alarms.
If your Windows Security Center reports Bitdefender Antivirus or Firewall is turned off, follow the steps below to fix the problem.
Step 1 – Turn on Bitdefender Antivirus from Windows Security Center
Use Windows to enable the Bitdefender modules indicated as being off by clicking on the Turn on button.
If there is only one option, you can click on Turn on and then choose “Yes” in the User Account Control dialogue, to confirm that you trust this publisher and you want to run the Bitdefender program.
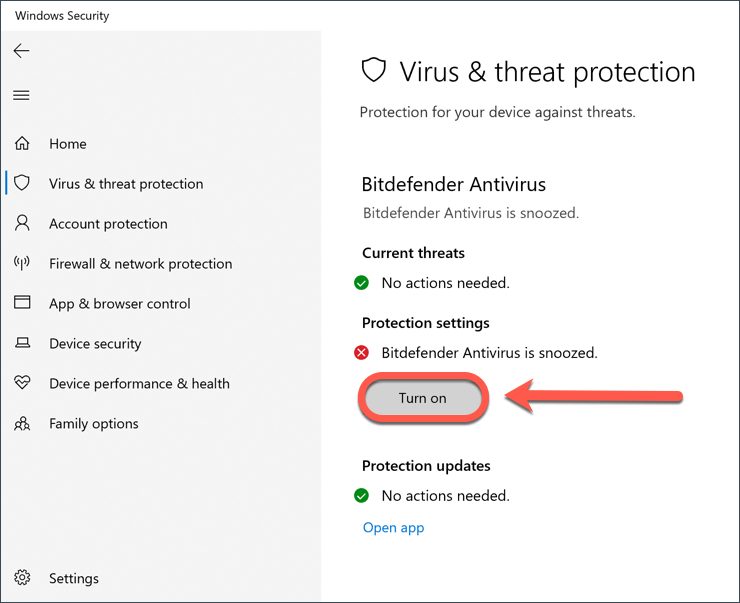
If there are multiple choices, please on View antivirus programs / View antispyware programs / View firewall options and then choose to turn on the Bitdefender feature(s).
Go to the next step if Windows continues to report that Bitdefender Antivirus / Firewall is turned off or snoozed.
Step 2 – Toggle Bitdefender Shield / Firewall to the on position
Next, check whether or not the Antivirus or the Firewall (the module that Windows Security Center reports being off) is indeed disabled in the Bitdefender interface.
To check the Antivirus status
1. Launch your Bitdefender security program from the ![]() desktop shortcut.
desktop shortcut.
2. On the left-hand side of the main interface, choose the “Protection” section.
3. Then click on “Open” under the “Antivirus” panel.
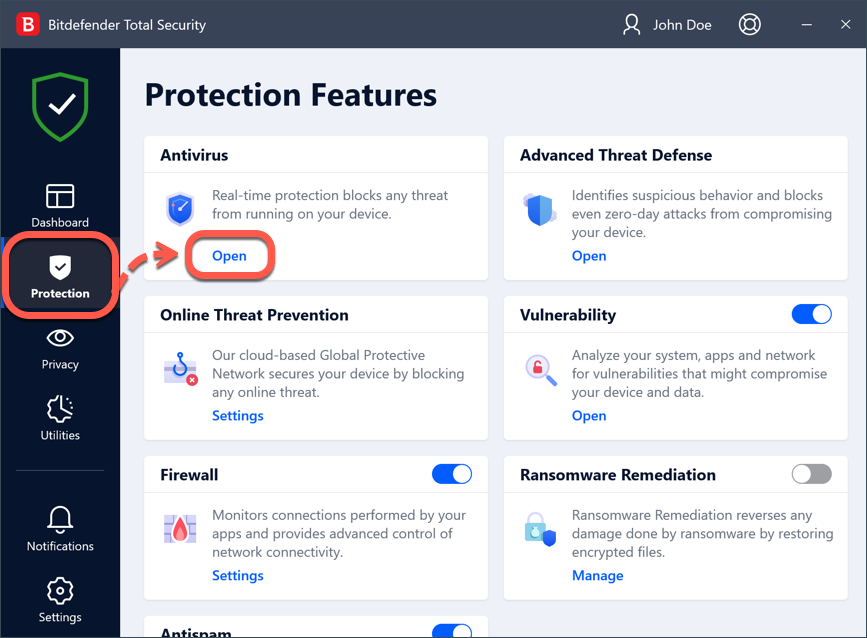
4. In the “Advanced” tab, make sure Bitdefender Shield is toggled to the on position (blue switch). 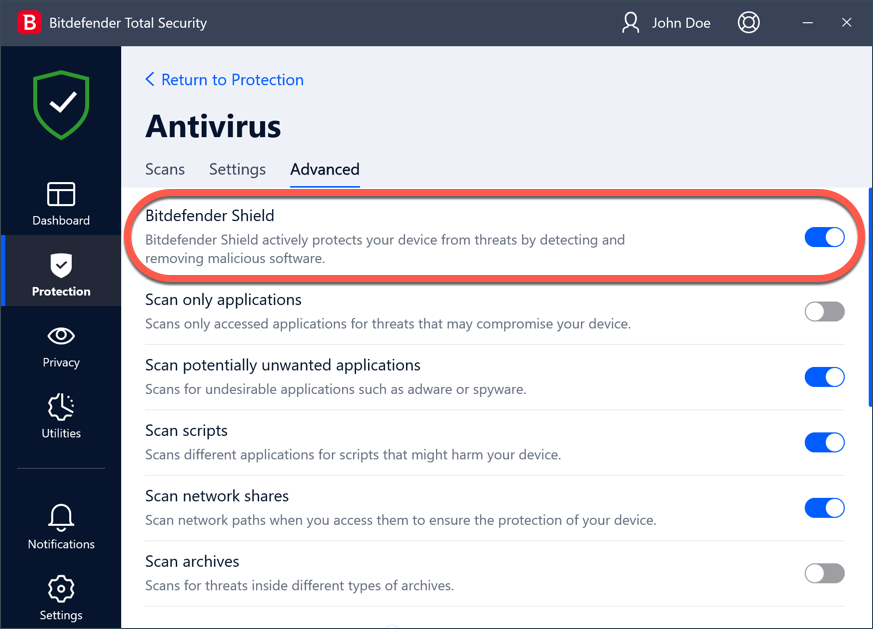
If the Bitdefender Shield is disabled, try turning it on and then check if the Windows Security alert disappears.
To check the Firewall status
To check if Bitdefender Firewall is enabled, return to the “Protection” section and switch on the toggle button for “Firewall”.
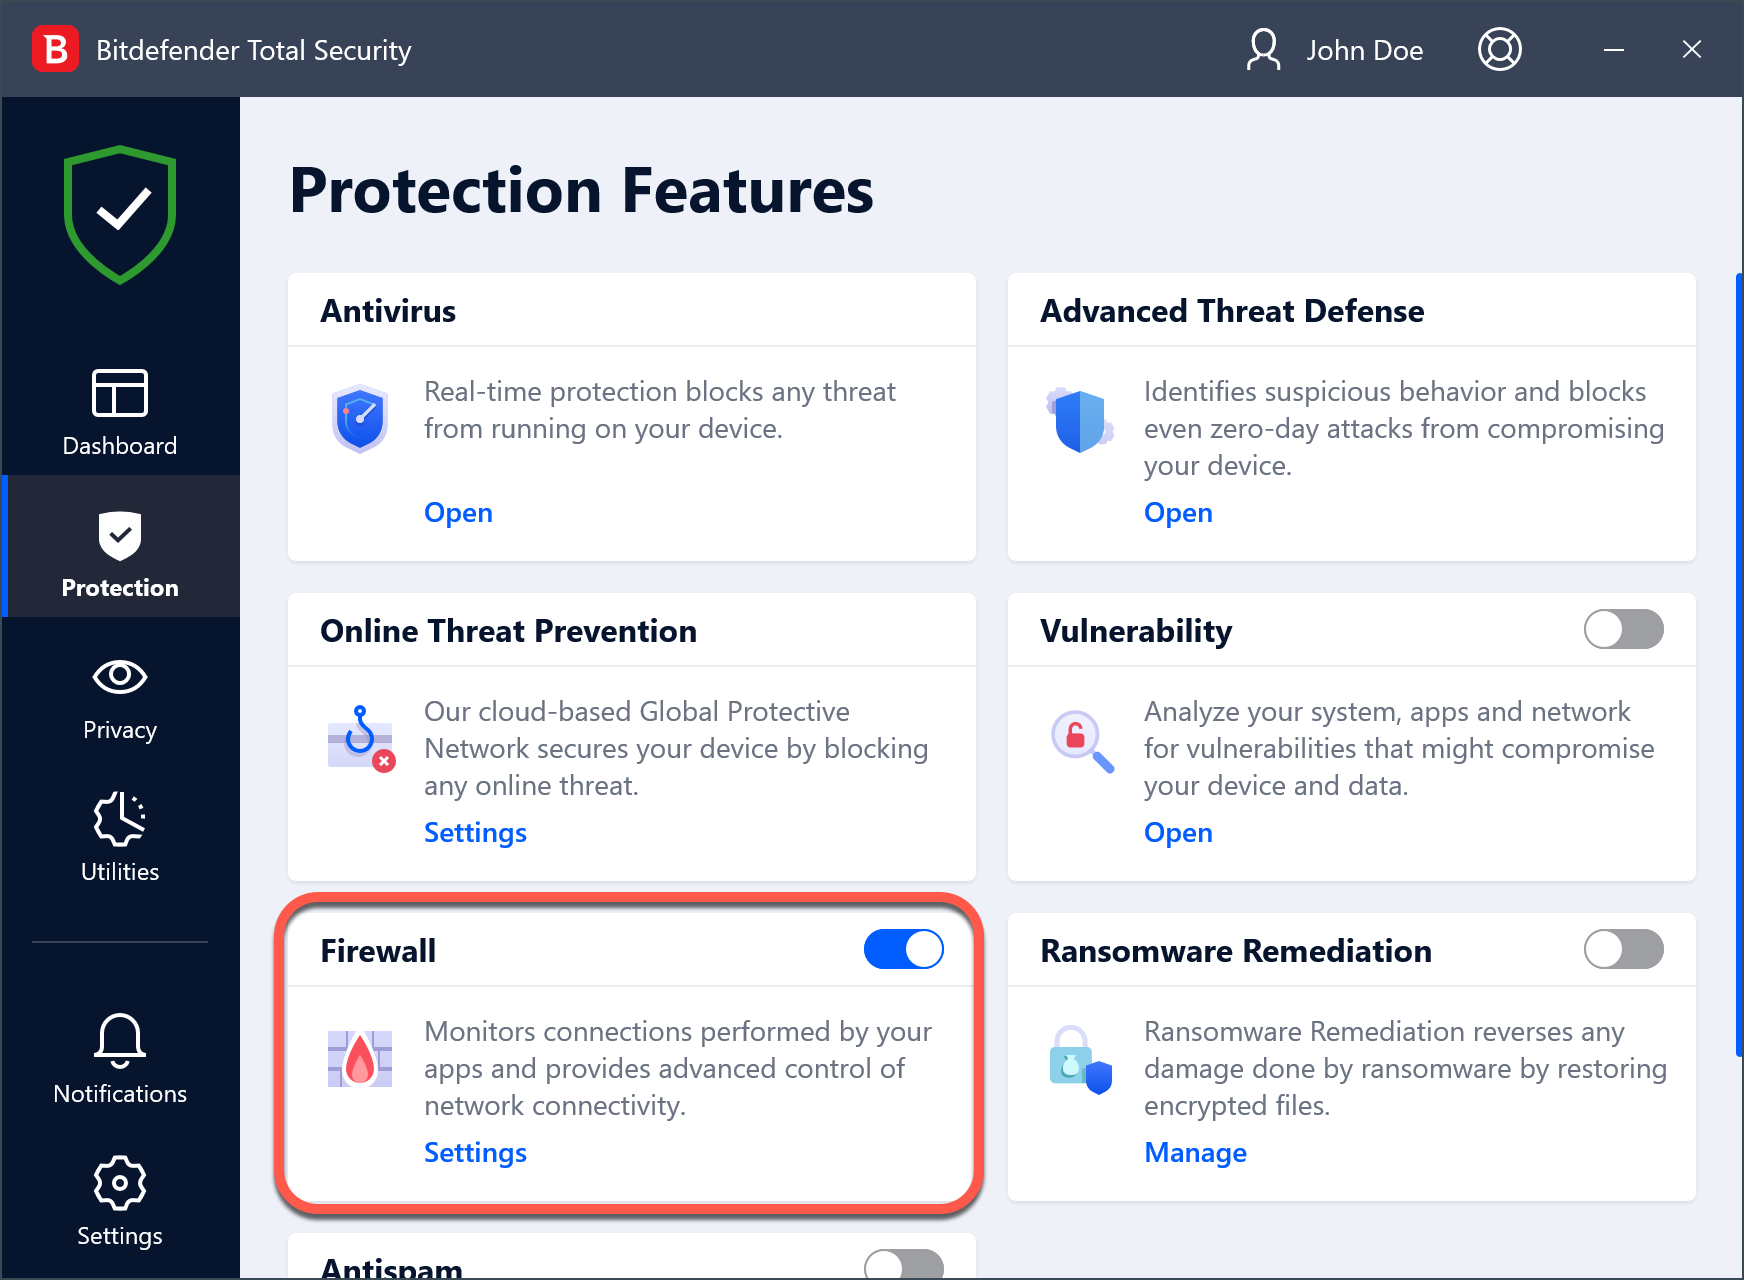
If the Firewall is disabled, try turning it on and then check if the Windows Security alert disappears. What to do when Bitdefender Firewall can’t be activated or turns itself off.
Step 3 – Reset Windows Security Center
If you find out that Bitdefender Antivirus / Firewall is actually turned on, but Windows Security Center still reports otherwise, the Windows Security feature is likely defective. It is recommended to reset Windows Security Center on your computer, in order to repair this app and make sure it is not misfunctioning, causing false alarms. There are three different methods to reset the Windows Security app, and we will list each of them below.
Method 1: Reset Windows Security Center from App Settings
This is the easiest way to reset the Windows Security feature.
ⓘ Note: This reset method only works on Windows 8, Windows 10, Windows 11, and newer Windows versions.
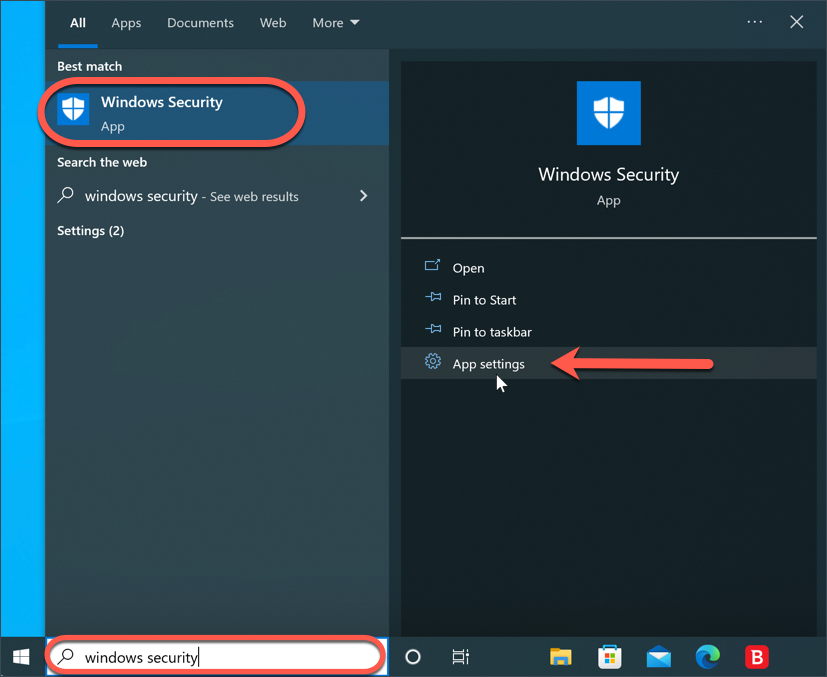
1. Click the Windows Start ⊞ menu on the taskbar and type in Windows Security, then click on ⚙︎ App settings on the right-hand side of the search results.
2. In Windows Security settings, scroll down and click the Reset button.
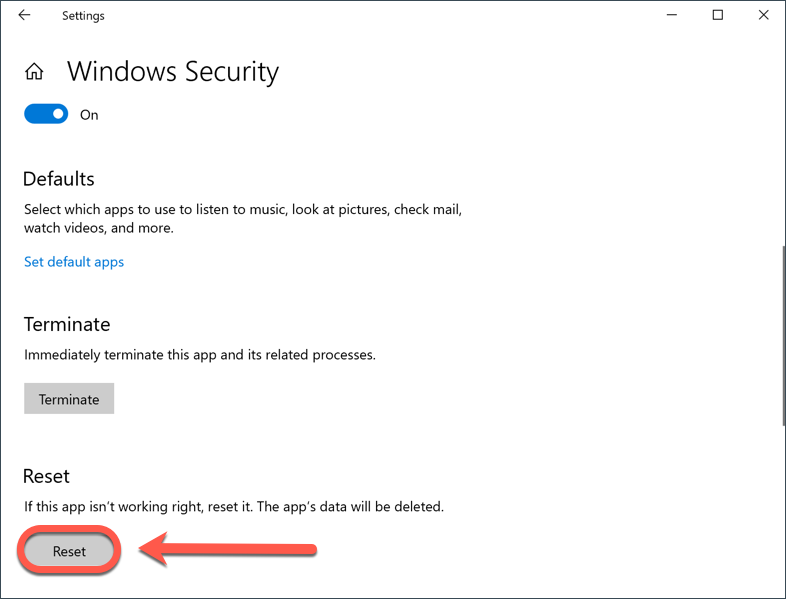
3. Confirm the reset action when prompted, then restart the computer to complete the repair process.
Method 2: Reset Windows Security with PowerShell
You can also use PowerShell to reset Windows Security Center.
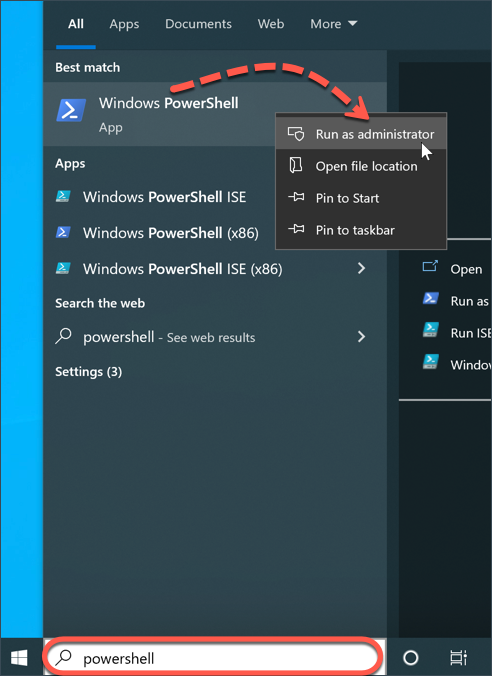
1. First, start Windows PowerShell by using Administrator rights:
- Click the Windows Start ⊞ menu on the taskbar.
- Type in powershell
- Right-click on Windows PowerShell in the list of search results, and select Run as administrator.
2. Copy and paste Get-AppxPackage | % { Add-AppxPackage -DisableDevelopmentMode -Register “$($_.InstallLocation)\AppxManifest.xml” -verbose } to the PowerShell window.
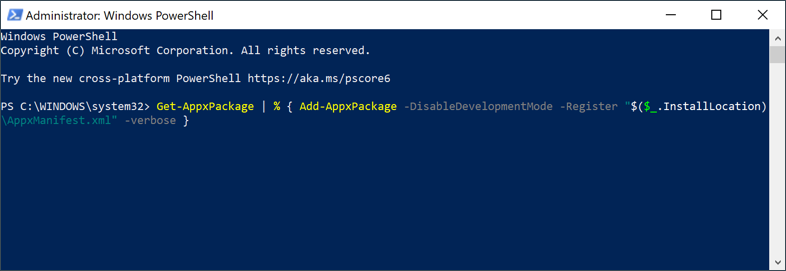
3. Then press Enter on your keyboard to run the above command and wait for it to finish processing.
4. Close the PowerShell when the process is complete, then restart the computer.
Method 3: Reset Windows Security Center from Command Prompt
This method uses Command Prompt to resolve the problem with Windows Security Center not reflecting real facts about the system’s security.
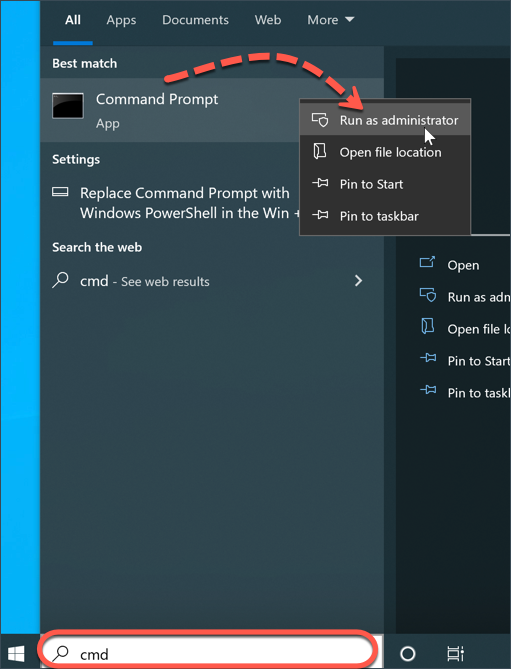
a) First open an elevated command prompt: click the Windows Start ⊞ menu on the taskbar and type in cmd then right-click on Command Prompt in the results and choose Run as administrator.
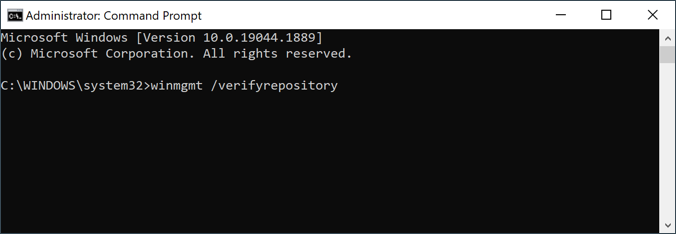
b) In the command prompt window, type or copy and paste the command below, then press Enter on your keyboard.
winmgmt /verifyrepository
c) You will get either one of these two results:
WMI repository is consistent. It means that no problems were detected. Proceed to step f)
WMI repository is inconsistent. It means that problems were found. Proceed to step d)
d) To rebuild the repository type the command below and hit Enter
winmgmt /salvagerepository
e) You will receive one of the results below:
WMI repository is consistent – It means that no problems were detected. Go to step f)
WMI repository salvage failed – The command failed to rebuild WMI repository. Try repeating step d) again.
WMI repository has been salvaged – It means the WMI repository has been successfully rebuilt. Go to the last step g)
f) Reset the repository to its initial state using the command below and hit Enter on the keyboard
winmgmt /resetrepository
g) Now reboot the PC to apply the changes. Once you start Windows again, you can see if the Windows action center works properly.