This article will guide you stepwise to switch from Kaspersky Password Manager to Bitdefender Password Manager. We will show you how to export passwords from Kaspersky and import them into Bitdefender Password Manager. Bitdefender can import data seamlessly from a multitude of password managers in various formats. Kaspersky Password Manager is not currently supported, so you will have to go through an additional step to move your Kaspersky accounts to Bitdefender Password Manager.
To get started, choose the step you need help with:
We’re going to walk you first through the process of exporting your password information from Kaspersky Password Manager. 1. Open your Kaspersky Password Manager 2. Access the application menu by pressing ••• Additional in the bottom left corner. 3. In the opened menu, go to ⚙︎ Settings. 4. Select the Import/Export entry and then scroll down and click the Export button in the ‘Export to text file’ section. 5. A new window comes up. Choose a file name and select the folder you want to export it to. When you’re ready, press the Save button. Kaspersky Password Manager will then export all your data to a text file (TXT). Next, you will have to convert the TXT file exported from Kaspersky Password Manager to a CSV format (comma-separated value) compatible with Bitdefender Password Manager. This CSV file will be used to move all of your accounts into Bitdefender Password Manager. To convert your file to a format that works with Bitdefender Password Manager: 1. Save on your device the CSV template below. It is pre-filled with examples to help you understand what each cell represents and what the data should look like. → Bitdefender Password Manager CSV template 2. Open the template in a spreadsheet program that supports CSV file editing such as Microsoft Excel, Apple Numbers, Google Docs or Libre Office. 3. Fill in the CSV file with your own data from the TXT file without changing the structure and name of the headers, columns, and rows. ⓘ Note: You may leave some fields blank if they are not relevant to you and are not marked as required in the list below. CSV file columns breakdown: Understanding each cell in the table This section elaborates on each cell in the table and provides accurate examples to help you organize and edit your own data inside the CSV file. For a simple CSV structure, suitable solely for account credentials, the document can have only 3 columns: url, username, and password. To create an extended Bitdefender CSV that doesn’t include just your Accounts (usernames & passwords) but also Identities, Notes, and Credit Cards, the document must have 23 columns. Each column is required for different data input. The order of columns doesn’t matter, although we recommend the sequence shown below. CSV header The specifications of the columns listed below are written in the same order, but divided according to the type of credentials they belong to. With this structure, you will need to choose Bitdefender Password Manager as the file source in the import data screen. The first two columns named modelType & modelVersion indicate the type of data they store: This column determines the category of credentials. Can contain only Account, Identity, Note, or CreditCard. Please enter the number 3 for the Account category and the number 1 for Identity, Credit card, and Note. Account Accounts store your login information on websites and use the following fields: The web domain or login page you need to connect to. Maximum 5000 characters allowed. Username or email address used to sign in to the account. Maximum 1024 characters allowed. This is where your account password is saved. Maximum 1024 characters allowed. Set the account as the user’s favorite. Can contain either FALSE or TRUE. Any additional notes about the account. A maximum of 10000 characters is allowed. Identity Identities autofill contact information and keep your contacts organized. Each identity line uses the following columns – most of them are self-explanatory: First name of the identity holder. A maximum of 1024 characters is allowed. The surname of the ID holder. A maximum of 1024 characters is allowed. Name of the country where the identity holder lives. A maximum of 1024 characters is allowed. Zip code of the place where the identity holder lives. A maximum of 1024 characters is allowed. The city where that person lives. A maximum of 1024 characters is allowed. The street on which they live. A maximum of 1024 characters is allowed. Additional street information. A maximum of 1024 characters is allowed. Name of the company where the identity holder works. A maximum of 1024 characters is allowed. Specify here the region where the identity holder resides lives. A maximum of 1024 characters is allowed. A maximum of 1024 characters is allowed. Email address of the identity holder. A maximum of 1024 characters is allowed. Telephone number of the identity holder. A maximum of 1024 characters is allowed. Any comments on identity. A maximum of 10000 characters is allowed. Note Bitdefender Notes can be used to store and organize sensitive data such as software activation keys, Wi-Fi settings, passport information, etc. The body of the Note. A maximum of 10000 characters is allowed. Lets you chromatically mark that note for better data visualization. This field can be left blank, but the column is mandatory. Contains just one number that represents a particular color (0 – 7). CreditCard Bitdefender Password Manager can be set up to automatically fill in your credit card details when you shop online. Full name of the cardholder. A maximum of 1024 characters is allowed. Input your credit card number. A minimum of 12 and a maximum of 19 characters is allowed. Please note that this field must be formatted as a number without decimals. The security code is the CCV/CVV of the credit card. A maximum of 1024 characters is allowed. Credit card PIN code. A maximum of 3 digits is allowed (4 digits are only allowed for American Express cards). This is your credit card expiry month. A number from 01 to 12 is allowed (MM format). Credit card expiry year. Only a valid year is allowed – current or future year (YYYY format). Enter one of the following card types in this exact format: generic-card, visa, master-card, american-express, diners-club, discover, jcb, unionpay, maestro Any comments on the card. A maximum of 10000 characters is allowed. Examples of CSV data: Header, Account, Identity, Credit Card, Note Special characters with double quotation marks in value should be escaped. Thus, if your data contains commas and other punctuation marks, please replace them with double quotes. For more details, look up online “CSV escaping”. Must be at the top of the CSV file In the example below the first line is the CSV header. The second and third lines will import two accounts. In this example, the first line is the CSV header. The second and third lines will import two identities. The first line is the CSV header. The second and third lines will import two credit cards. The first line is the CSV header. The second and third lines will import two notes. This is what the data should look like in the end, after adding the header, two accounts, identities, cards, and notes. Save the modifications when you have finished editing your CSV file. Then follow the instructions in the section below to merge the data into Bitdefender Password Manager. Finally, you just need to import the CSV file into Bitdefender Password Manager. 1. Click the Password Manager icon 2. Open the Password Manager menu ≡ to expand the sidebar menu on the left-hand side and click on ⚙︎ Settings. 3. Scroll down to the “Data” section and click on the “Import data” option. 4. At this step, it is essential to select “Bitdefender Password Manager” in the drop-down menu. Input your master password in the corresponding field, then click on “Choose file”. ⓘ Note: If you have created a basic CSV structure with 3 columns (url, username, password) to import only the usernames and passwords you use to log in to websites, choose “Chrome” instead of Bitdefender Password Manager as your file source in the import screen. 5. Finally select the CSV file you’ve just prepared, then press the Continue button. A loading screen will appear, after which Bitdefender will display a summary of the number and types of data that were successfully imported. Once imported, your passwords will become accessible on all devices where the Bitdefender Password Manager application or browser extension is installed. ⓘ Note: When you have finished migrating your accounts to Bitdefender Password Manager, it is recommended to delete both the TXT and CSV files used in this process. Otherwise, your usernames and passwords will remain in plaintext on your device. Anyone with access to the device can read them. Use this guide to troubleshoot various issues that might arise while importing data from the CSV file into Bitdefender Password Manager – Troubleshooting Guide: Why is my CSV not importing correctly?Step 1 - Export Passwords from Kaspersky Password Manager
![]() application.
application.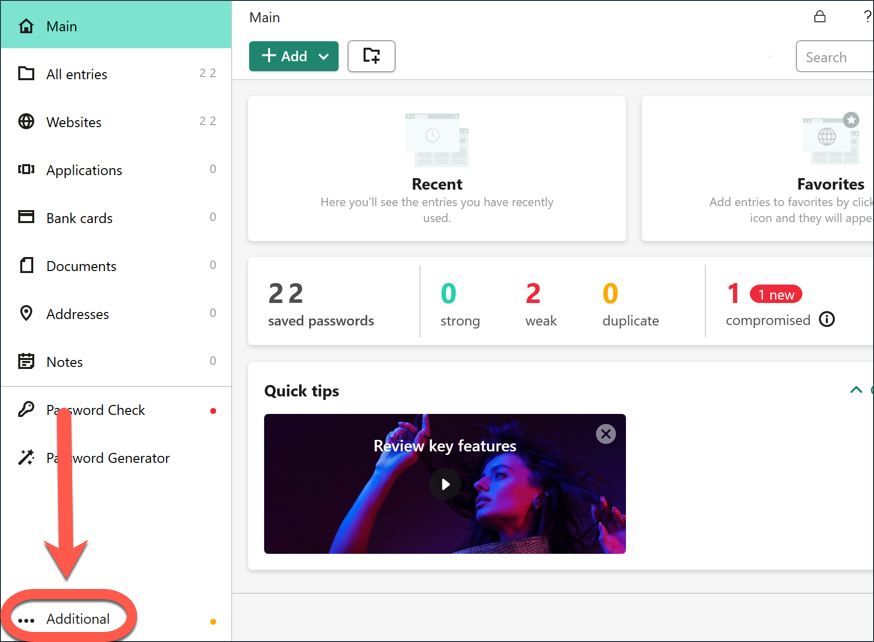
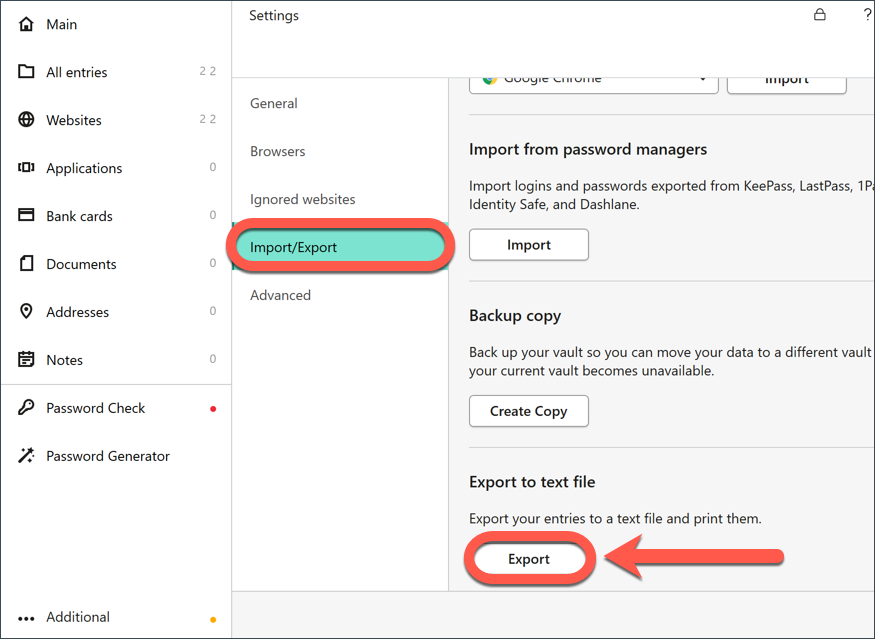
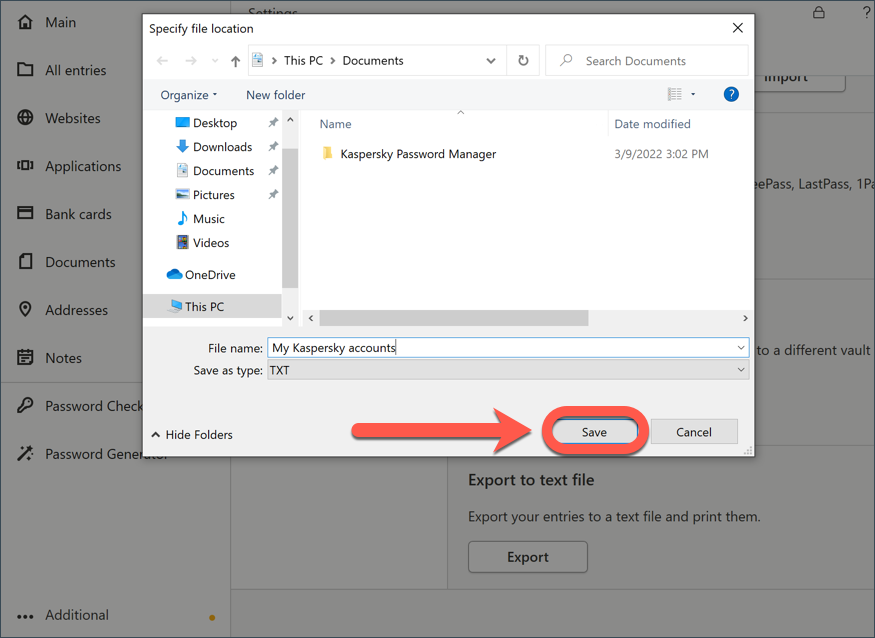
Step 2 - Convert your TXT file exported from Kaspersky to CSV
modelType, modelVersion, url, username, password, favorite, firstName, lastName, country, zip, city, street, county, email, phoneNumber, text, color, name, number, securityCode, pinCode, type, expirationDateMonth, expirationDateYear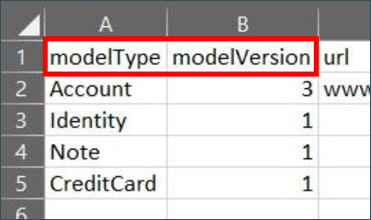


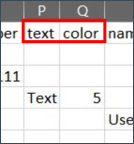

"modelType","modelVersion","name","cardName","number","securityCode","pinCode","type","expirationDateMonth","expirationDateYear","notes","title","text","color","url","username","password","favorite","firstName","lastName","country","zip","city","street","street2","company","county","region","email","phoneNumber"
"modelType","modelVersion","name","cardName","number","securityCode","pinCode","type","expirationDateMonth","expirationDateYear","notes","title","text","color","url","username","password","favorite","firstName","lastName","country","zip","city","street","street2","company","county","region","email","phoneNumber"
"Account","3",,,,,,,,,"optional note with a double quote "" inside","1st optional account title",,,"https://requiredaccounturl.com","required user login","optional password","false",,,,,,,,,,,,
"Account","3",,,,,,,,,"optional note with a double quote "" inside 2","2nd optional account title",,,"https://requiredaccounturl2.com","required user login 2","optional password 2","false",,,,,,,,,,,,
"modelType","modelVersion","name","cardName","number","securityCode","pinCode","type","expirationDateMonth","expirationDateYear","notes","title","text","color","url","username","password","favorite","firstName","lastName","country","zip","city","street","street2","company","county","region","email","phoneNumber"
"Identity","1",,,,,,,,,"optional note with a double quote "" inside","1st optional identity title",,,,,,,"optional first name","optional last name","optional country","optional zip","optional city","required address line 1","optional address line 2","optional company name","optional county","optional state","[email protected]","optional phone number"
"Identity","1",,,,,,,,,"optional note with a double quote "" inside 2","2nd optional identity title",,,,,,,"optional first name 2","optional last name 2","optional country 2","optional zip 2","optional city 2","required address line 1 2","optional address line 2 2","optional company name 2","optional county 2","optional state 2","[email protected]","optional phone number 2"
"modelType","modelVersion","name","cardName","number","securityCode","pinCode","type","expirationDateMonth","expirationDateYear","notes","title","text","color","url","username","password","favorite","firstName","lastName","country","zip","city","street","street2","company","county","region","email","phoneNumber"
"CreditCard","1","required cardholder name","1st optional card name","4111111111111111","111","1111","visa","01","2021","optional note with a double quote "" inside",,,,,,,,,,,,,,,,,,,
"CreditCard","1","required cardholder name 2","2nd optional card name","2222400050000009","111","1111","master-card","01","2021","optional note with a double quote "" inside 2",,,,,,,,,,,,,,,,,,,
"modelType","modelVersion","name","cardName","number","securityCode","pinCode","type","expirationDateMonth","expirationDateYear","notes","title","text","color","url","username","password","favorite","firstName","lastName","country","zip","city","street","street2","company","county","region","email","phoneNumber"
"Note","1",,,,,,,,,,"1st optional note title","required text with a double quote "" inside 1","0",,,,,,,,,,,,,,,,
"Note","1",,,,,,,,,,"2nd optional note title","required text with a double quote "" inside 2","0",,,,,,,,,,,,,,,,
"modelType","modelVersion","name","cardName","number","securityCode","pinCode","type","expirationDateMonth","expirationDateYear","notes","title","text","color","url","username","password","favorite","firstName","lastName","country","zip","city","street","street2","company","county","region","email","phoneNumber"
"Account","3",,,,,,,,,"optional note with a double quote "" inside","1st optional account title",,,"https://requiredaccounturl.com","required user login","optional password","false",,,,,,,,,,,,
"Account","3",,,,,,,,,"optional note with a double quote "" inside 2","2nd optional account title",,,"https://requiredaccounturl2.com","required user login 2","optional password 2","false",,,,,,,,,,,,
"Identity","1",,,,,,,,,"optional note with a double quote "" inside","1st optional identity title",,,,,,,"optional first name","optional last name","optional country","optional zip","optional city","required address line 1","optional address line 2","optional company name","optional county","optional state","[email protected]","optional phone number"
"Identity","1",,,,,,,,,"optional note with a double quote "" inside 2","2nd optional identity title",,,,,,,"optional first name 2","optional last name 2","optional country 2","optional zip 2","optional city 2","required address line 1 2","optional address line 2 2","optional company name 2","optional county 2","optional state 2","[email protected]","optional phone number 2"
"CreditCard","1","required cardholder name","1st optional card name","4111111111111111","111","1111","visa","01","2021","optional note with a double quote "" inside",,,,,,,,,,,,,,,,,,,
"CreditCard","1","required cardholder name 2","2nd optional card name","2222400050000009","111","1111","master-card","01","2021","optional note with a double quote "" inside 2",,,,,,,,,,,,,,,,,,,
"Note","1",,,,,,,,,,"1st optional note title","required text with a double quote "" inside 1","0",,,,,,,,,,,,,,,,
"Note","1",,,,,,,,,,"2nd optional note title","required text with a double quote "" inside 2","0",,,,,,,,,,,,,,,,
Step 3 - Import the new CSV file into Bitdefender Password Manager
![]() in your web browser toolbar, or launch the Password Manager app on your smartphone. Enter your master password if prompted.
in your web browser toolbar, or launch the Password Manager app on your smartphone. Enter your master password if prompted.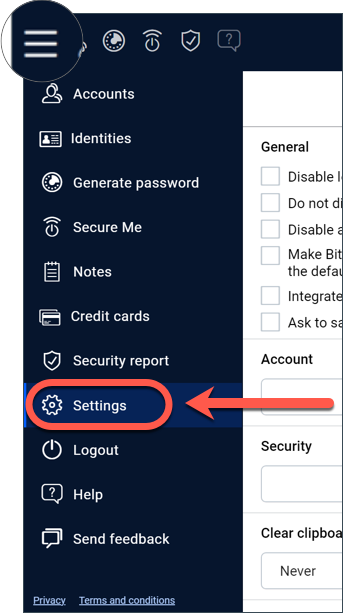
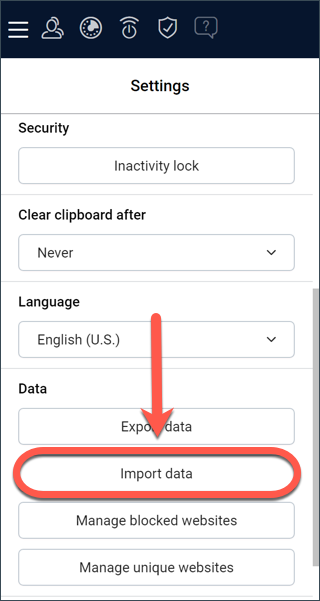
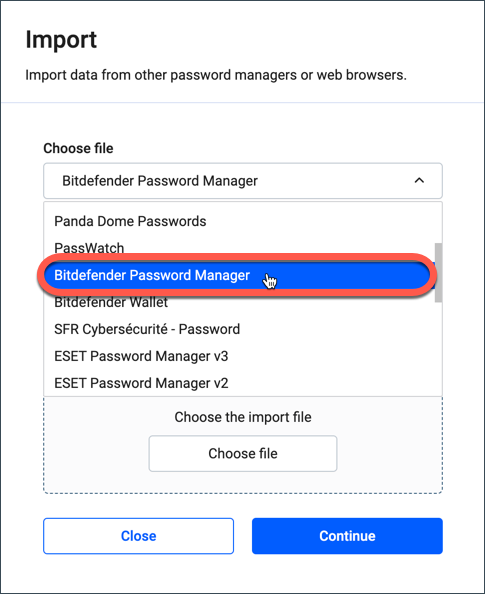
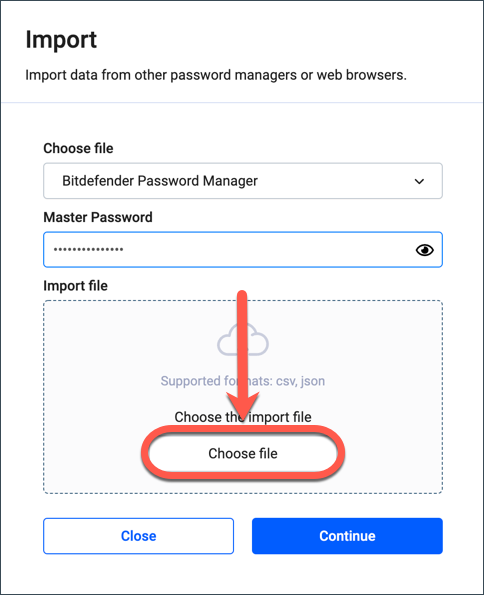
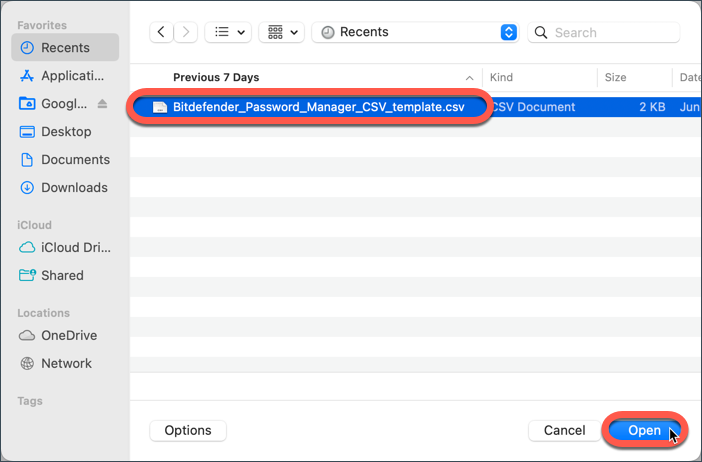
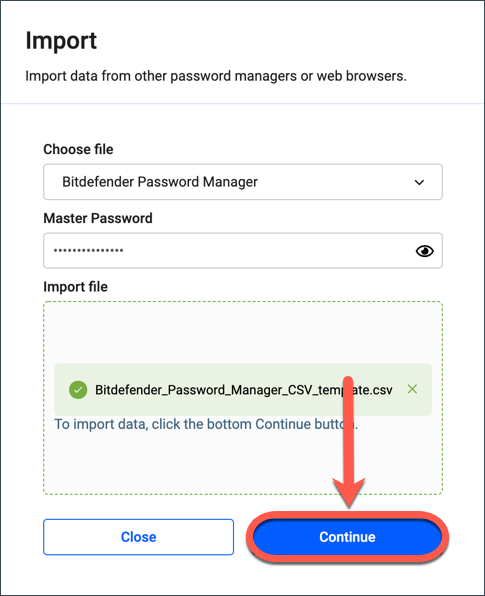
That’s it, you have successfully transferred your data from Kaspersky Password Manager to Bitdefender Password Manager!