How to install the GravityZone security agent on Linux machines (on premise)
You will find hereinafter a detailed procedure for installing the GravityZone security agent on a Linux virtual machine, including how to download the appropriate installation package to the machine, unpack the archive and manually install it via a terminal session.
- In GravityZone Control Center, go to Network > Packages.
- Select the installation package from the list.
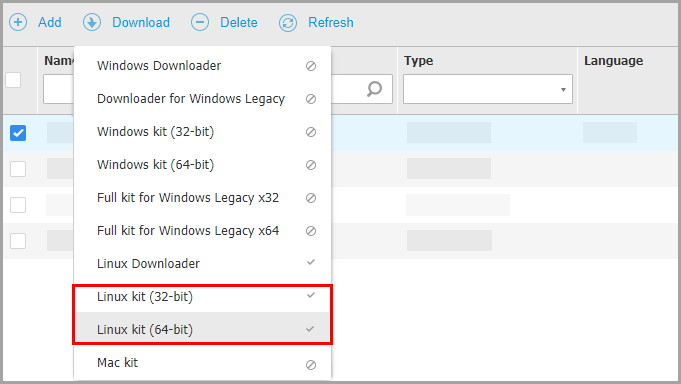
- Click the Download button at the upper side of the page and select the Linux kit (32-bit or 64-bit, according to your virtual machine OS type).


Note: If the security agent kit is not already available in GravityZone, it will be automatically downloaded to the appliance when downloading the specific installation package. When an installation package is unavailable, go to Configuration > Miscellaneous menu (it requires a GravityZone account with manage solution rights), and review the options for When an unavailable kit is needed.
- Transfer the downloaded archive to the target virtual machine using, for example, a SSH client or through a SAMBA share.
- Open a terminal session on the Linux virtual machine using an account with administrative privileges.
- Run the following commands to unpack and run the installer:
cd /root
tar –xvf fullKit_unix64.tar
chmod +x installer
./installer

Note: The cd /rootcommand is an example for specifying the virtual machine folder where you have transferred the downloaded installation archive. The package name mentioned above is also an example. You must enter the name of the specific package you have downloaded.
- Bitdefender Endpoint Security Tools for Linux will be installed in a few moments. To check that the agent has been installed on the endpoint, run this command:
$ service bd status
In a few minutes after the security agent has been installed, the endpoint will show up as managed in the GravityZone network inventory.


 Australia:
(+61) 1300 888 829, (+61) 385 956 732
 Canada:
(+1) 647 977 5827, (+1) 647 367 1846
  Deutschland:
(+49) 2304 9993004
  España:
(+34) 937 370 223
 France:
+33(0)184070660
  New
Zealand: (+64) 0800 451 786
  Osterreich:
(+49) 2304 9993004
  România:
(+40) 21 264 1777, (+40) 374 303 077
  Schweiz:
(+49) 2304 9993004
  United
States: (+1) 954 414 9621, (+1) 954
281 4669
  United
Kingdom: (+44) 2036 080 456, (+44) 2080 991 687
  WorldWide: (+40) 31 620 4235,
(+40) 374 303 035