Best practices
Creating custom MAC address pools in Hyper-V
This section describes how to create custom MAC address pools in Hyper-V.
Using Hyper-V Dynamic MAC Address Regeneration can change the MAC address of a virtual machine which can lead to duplicate machines in the Control Center.
To avoid this issue, a custom MAC address pool can be created by following these steps:
Open the Fabric workspace.
On the Fabric pane, select Networking and click on MAC Address Pools.
On the Home tab, click on Fabric Resources.
On the Home tab, Create group, click on Create MAC Pool.
In Name and Host Group, populate the fields and click Next.
In MAC Address Range, specify the beginning and ending MAC address.
On the Summary page, confirm the settings and click Finish. Close the dialog box, after the status has changed to Completed.
Understanding Network discovery
This section explains how GravityZone Control Center displays all your company's computers in Network inventory.
GravityZone includes an automatic network discovery mechanism intended to detect workgroup computers.
Security for Endpoints relies on the Microsoft Computer Browser service to perform network discovery. The Computer Browser service is a networking technology used by Windows-based computers to maintain updated lists of domains, workgroups, and the computers within them and to supply these lists to client computers upon request. Computers detected in the network by the Computer Browser service can be viewed by running the net view command in a Command Prompt window.

To enable Network Discovery, you must have the Bitdefender security agent already installed on at least one computer in the network. This computer will be used to scan the network.
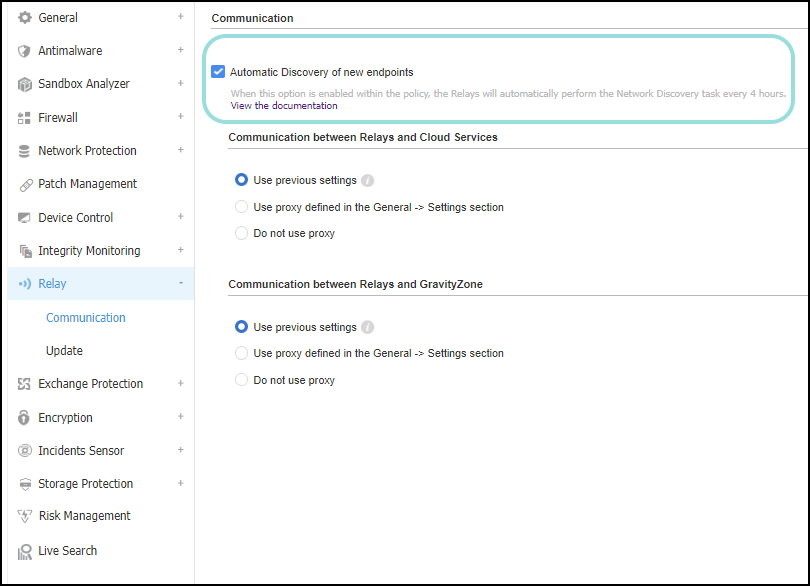
You can enable the automatic network discovery by selecting the Automatic Discovery of new endpoints check box in Relay > Communication section of the policy settings.

Activating this option determines the relays to perform the Network discovery task every 4 hours.
This option is disabled by default for new GravityZone users. For existing custom policies, the option remains enabled.
In order to successfully discover all the computers (servers and workstations) that will be managed from Control Center, the following are required:
Computers must be joined in a workgroup or domain and connected via an IPv4 local network. Computer Browser service does not work over IPv6 networks.
Several computers in each LAN group (workgroup or domain) must be running the Computer Browser service. Primary Domain Controllers must also run the service.
NetBIOS over TCP/IP (NetBT) must be enabled on computers. Local firewall must allow NetBT traffic.
File sharing must be enabled on computers. Local firewall must allow file sharing.
A Windows Internet Name Service (WINS) infrastructure must be set up and working properly.
For Windows 7 and later, Network discovery must be turned on (Control Panel > Network and Sharing Center > Change Advanced Sharing Settings).
To be able to turn on this feature, the following services must first be started:
DNS Client
Function Discovery Resource Publication
SSDP Discovery
UPnP Device Host
In environments with multiple domains, it is recommended to set up trust relationships between domains so that computers can access browse lists from other domains.
Computers from which Endpoint Security queries the Computer Browser service must be able to resolve NetBIOS names.
Note
The Network discovery mechanism works for all supported operating systems, including Windows Embedded versions, provided the requirements are met.
Delete stale endpoints in GravityZone Control Center
This topic describes how to delete stale endpoints in GravityZone Control Center.
Log in to GravityZone Control Center.
Go to Network > Filters.
Under Type, select the Computers and Virtual Machines check boxes.
Under Depth, select All items recursively.
Click Save.
The right side pane of the Network page will display all available endpoints.
Note
The endpoints that have not performed a security update in the past 24 hours or more appear as having issues. This happens because the endpoints are offline.
Click the Last Seen column header to view the endpoints in descending order. The endpoints that have been offline the longest are displayed at the top of the list.
Select the check boxes corresponding to the endpoints you want to delete.
Click Delete in the action toolbar at the top of the screen. Following this action, the following will happen:
For endpoints that are not part of any integrated infrastructure (Active Directory, Amazon EC2, vCenter, Xen etc.):
The endpoint is moved to the Deleted folder.
An uninstall task is created.
You can view the task in the Network > Tasks page.
The task will be pending for 72 hours, after which it will expire if the endpoint does not receive it (for example, if the endpoint does not come back online).
You can delete the task in the Network > Tasks page.
A license seat is released. If the endpoint comes online again, it will remain in the Deleted folder with the modules of the security agent expired.
You can check the licensing information in the My Company page.
For endpoints that are part of Active Directory or other integrated infrastructure:
The endpoint is not moved to the Deleted folder, but becomes unmanaged in the Network inventory.
An uninstall task is not created.
A license seat is released.
If the endpoint comes back online, it will be licensed again.