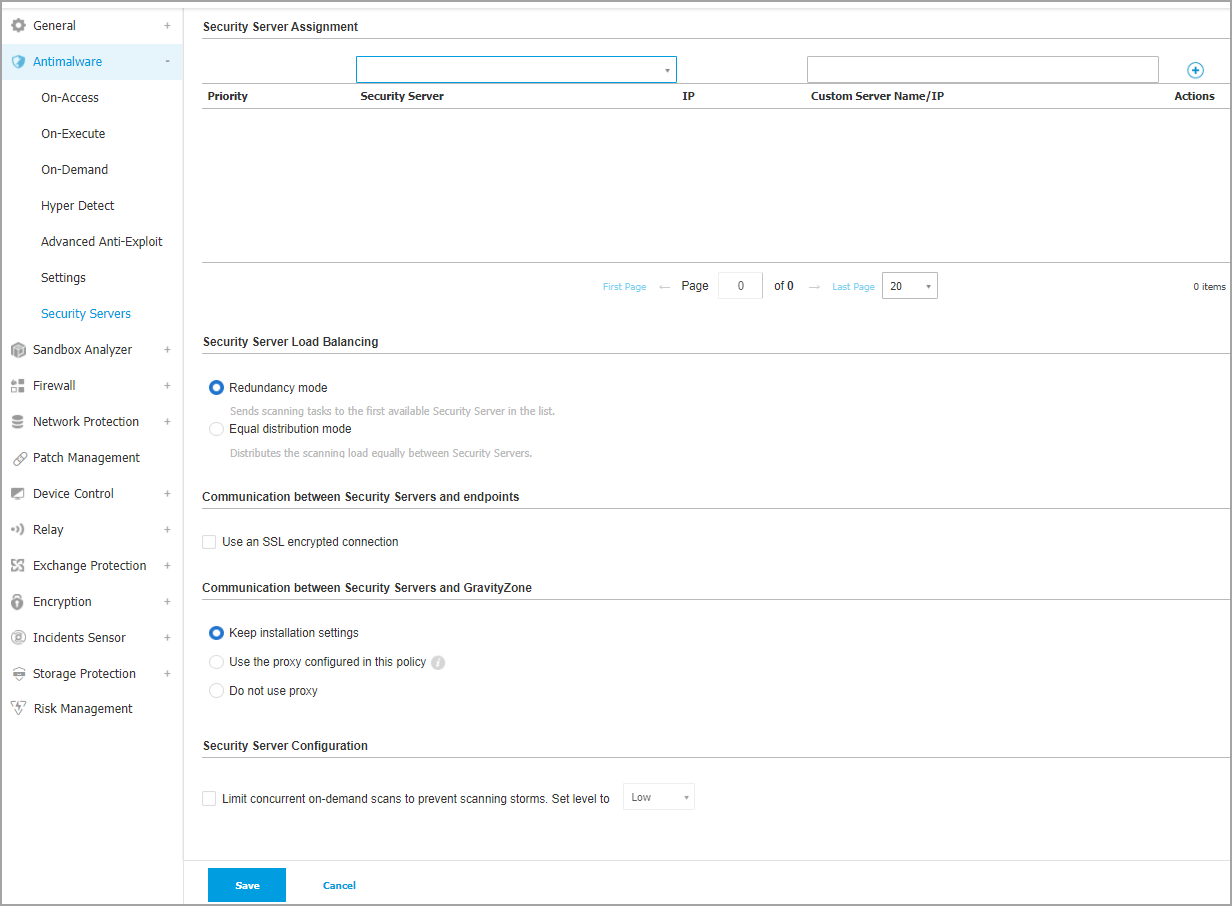
Security Servers
In the Antimalware > Security Servers section of the policy, you can assign Security Servers to endpoints in your environment, to streamline the distribution of scanning tasks, and customize Security Server specific settings.

Note
Availability and functioning of this feature may differ depending on the license included in your current plan.
Security Server assignment
You can assign one or several Security Servers to the target endpoints, and set the priority with which endpoints will elect a Security Server to send scanning requests.
Note
It is recommended to use Security Servers for scanning virtual machines or computers with low resources.
Make sure that each Security Server is added to a single list to maintain the load-balancing algorithm consistent across all Security Servers. In addition, when configuring multiple policies, make sure that the Security Server lists don't overlap between different policies.
To assign a Security Server to the target endpoints, add the Security Servers you want to use, in the Security Server Assignment table, as follows:
Click the Security Server drop-down list and then select a Security Server.
If the Security Server is in DMZ or behind a NAT server, enter the FQDN or IP of the NAT server in the Custom Server Name/IP field.
Important
Make sure that port forwarding is correctly configured on the NAT server so that the traffic from endpoints can reach the Security Server. For details regarding ports, refer to GravityZone (cloud) communication ports.
Click the
 Add button in the Actions column.
The Security Server is added to the list.
Repeat the previous steps to add other Security Servers, if available or needed.
To set the priority of the Security Servers:
Use the up and down arrows available in the Actions column to increase or decrease each Security Server's priority.
When assigning more Security Servers, the one on top of the list has the highest priority and will be selected first.
If this Security Server is unavailable or overloaded, the next Security Server is selected.
Scan traffic is redirected to the first Security Server that is available and has a convenient load.
To remove a Security Server from the list, click the corresponding  Delete button in the Actions column.
Note
The antimalware and security server policies for Bitdefender must be updated by removing the reference to any deleted security servers.
Failing to update the policy could result in configuration issues and potential security vulnerabilities.
You can also assign Security Servers when you create or edit an installation package. For more information, refer to the Security server assignment step in Install security agents - standard procedure.
Security Server Load Balancing
You can customize how scanning tasks are being distributed among available Security Servers by choosing one of these Security Server operating modes:
Redundancy mode - choose this mode to send scanning requests to the first available Security Server.
Equal distribution mode - choose this mode to distribute the scanning load equally between Security Servers.
Communication between Security Servers and endpoints
Enable the Use an SSL encrypted connection option if you want to encrypt the connection between the target endpoints and the specified Security Server appliances.
By default, GravityZone uses self-signed security certificates. You can change them with your own certificates in the Configuration > Certificates page of Control Center.
Communication between Security Servers and GravityZone
Choose one of the available options to define your proxy preferences for the communication between the selected Security Server machines and GravityZone:
Keep installation settings - to use the same proxy settings defined with the installation package.
Use proxy defined in the General section - to use the proxy settings defined in the current policy, under General > Settings section.
Do not use proxy - when the target endpoints do not communicate with the specific Bitdefender components via proxy.
Security Server Configuration
Running multiple on-demand scan tasks on virtual machines sharing the same datastore can create antimalware scanning storms. To prevent this and to allow only a certain number of scan tasks to run at the same time:
Select the Limit the number of concurrent on-demand scans option.
Select the level of allowed concurrent scan tasks from the drop-down menu. You can choose a predefined level or enter a custom value.
The formula to find the maximum limit of scan tasks for each predefined level is:
N = a x MAX(b ; vCPUs - 1), where:N= maximum limit of scan tasksa= multiplying coefficient, having the following values:1- for Low;2- for Medium;4- for HighMAX(b;vCPU-1)= a function that returns the maximum number of scan slots available on the Security Server.b= the default number of on-demand scan slots, which currently is set to four.vCPUs= number of virtual CPUs assigned to the Security Server
For example:
For a Security Server with 12 CPUs and a High level of concurrent scans, we have a limit of:
N = 4 x MAX(4 ; 12-1) = 4 x 11 = 44concurrent on-demand scan tasks.
Enable affinity rules for Security Server Multi-Platform
Choose which behavior the Security Server should have when its host enters in maintenance mode:
If enabled, the Security Server remains tied to the host and GravityZone shuts it down. When maintenance is over, GravityZone automatically restarts the Security Server.
This is the default behavior.
If disabled, the Security Server is moved to another host and continues to run. In this case, the Security Server name changes in Control Center to point the former host. The name change persists until the Security Server is moved back to its native host.
If the resources are sufficient, the Security Server can land on a host where another Security Server is installed.