Configuring monitoring policies
To manage security for your devices in Datto RMM, you execute Bitdefender components through monitoring policies and jobs. A monitoring policy configured at the site level executes Bitdefendercomponents to verify installation and update status, and deploy the security agent. For example, through a monitoring policy, you can raise a critical alert if a device is not protected and configure a response action to deploy the security agent.
Important
To make the Bitdefender components available to your actions, you need to add them to your favorite list.
Navigate to Components > All Components and click the star icon next to the following Bitdefender components:
Bitdefender GravityZone - Device Monitor
Bitdefender GravityZone - Endpoint Management [Datto Companion APP]
Creating a policy in the old UI
Notice
Due to a Datto RMM limitation for the new user interface (UI), components do not run correctly when used for both jobs and monitor responses on the same device.
In order to create a policy, we recommend using the Datto RMM legacy UI. Your Datto RMM account requires administrator rights to create policies.
To create a policy for your site:
In the Datto RMM Web Portal, click Sites to open the drop-down list.
Select a site and go to the Policies tab.
Click New site policy. The New Policy window appears.
Configure the following elements:
Name: Enter a name for your policy
Type: Monitoring
Based on: new policy
The New Monitoring Policy window appears.

To add targets:
Click Add a target.
Select a target type from the drop-down list.
For information about target types, refer to Filters and Groups in Datto documentation.
Choose your filters and groups.
For example, by selecting the Default Device Filter you can choose All Windows Desktops from the drop-down list.
Click Add to save the targets to the monitoring policy.
Notice
To add multiple targets, repeat the steps.

To add monitors:
Click Add a monitor.
In the Monitor Type section, select Component Monitor, click Next and choose BitdefenderGravityZone - Device Monitor from the right-side list.
Configure the Monitor Details section as follows:
Choose an action from the drop-down list and execution intervals:
Verify Install to check for security agent deployment. Select 30 minutes as best practice.
Verify Update to check for update status. Select 3 hours as best practice.
Verify Full Scan to check when the security agent has executed a full scan on the target last time. Select 24 hours as best practice.
Verify Quick Scan to check when the security agent has executed a quick scan on the target last time. Select 8 hours as best practice.
Warning
Make sure you set a correct execution interval to avoid errors.
Under Alert Details, choose an alert priority type.
Set a time interval for Auto-Resolution. Select After 10 minutes as best practice (no less than 5 minutes).
Warning
Make sure you set a correct execution interval to avoid errors.

Configure the Response Details section as follows:
Select Run the following component and select Bitdefender GravityZone - Endpoint Management [Datto Companion APP].
Choose an action from the drop-down list:
Install BEST to deploy the security agent.
Update BEST to update security agent.
Start Full Scan to begin a full scan task on the selected targets.
Start Quick Scan to begin a quick task on the selected targets.
Notice
Make sure to match the component action to the monitor action from step 3. For example, Verify Install with Install BEST or Verify Quick Scan with Start Quick Scan.
Configure email recipients to send out notifications when the alert is raised.

Under Ticket Details, configure the New Ticket details if the alert should generate a ticket.
For more information, refer to Alerts and tickets in Datto documentation.
To view alerts generated by monitors, refer to Manage monitors in Datto documentation.
To apply the policy immediately, click the Save and Push Changes button.
To only save the policy, click the Save Only button.

Creating a policy in the new UI
To create a policy for your site in the new UI:
In the Web Portal, go to Policies > Monitoring in the left-side menu and click Create Policy.

Enter a name and a description.
Under Scope, select Site.
For Type, select Monitoring.
Under Monitors, click Add Monitor.
In the Monitor Type window, click Select and choose Component from the right-side list.
Under the Alert section, click Select a Component Monitor and choose Bitdefender GravityZone - Device Monitor.

Next to the component, specify the interval in days for Verify Full Scan and Verify Quick Scan tasks to run.
Choose an action from the drop-down list and execution intervals:
Verify Install to check for security agent deployment. Select 30 minutes as best practice.
Verify Update to check for update status. Select 3 hours as best practice.
Verify Full Scan to check when the security agent has executed a full scan on the target last time. Select 24 hours as best practice.
Verify Quick Scan to check when the security agent has executed a quick scan on the target last time. Select 8 hours as best practice.
For Raise an alert of priority, select one of the available options according to your preferences.
For Auto resolve the alert if it is no longer applicable, select After 10 minutes as best practice (no less than 5 minutes).
Under the Response section, enable Run a Component and select Bitdefender GravityZone Endpoint Management [Datto Companion APP].
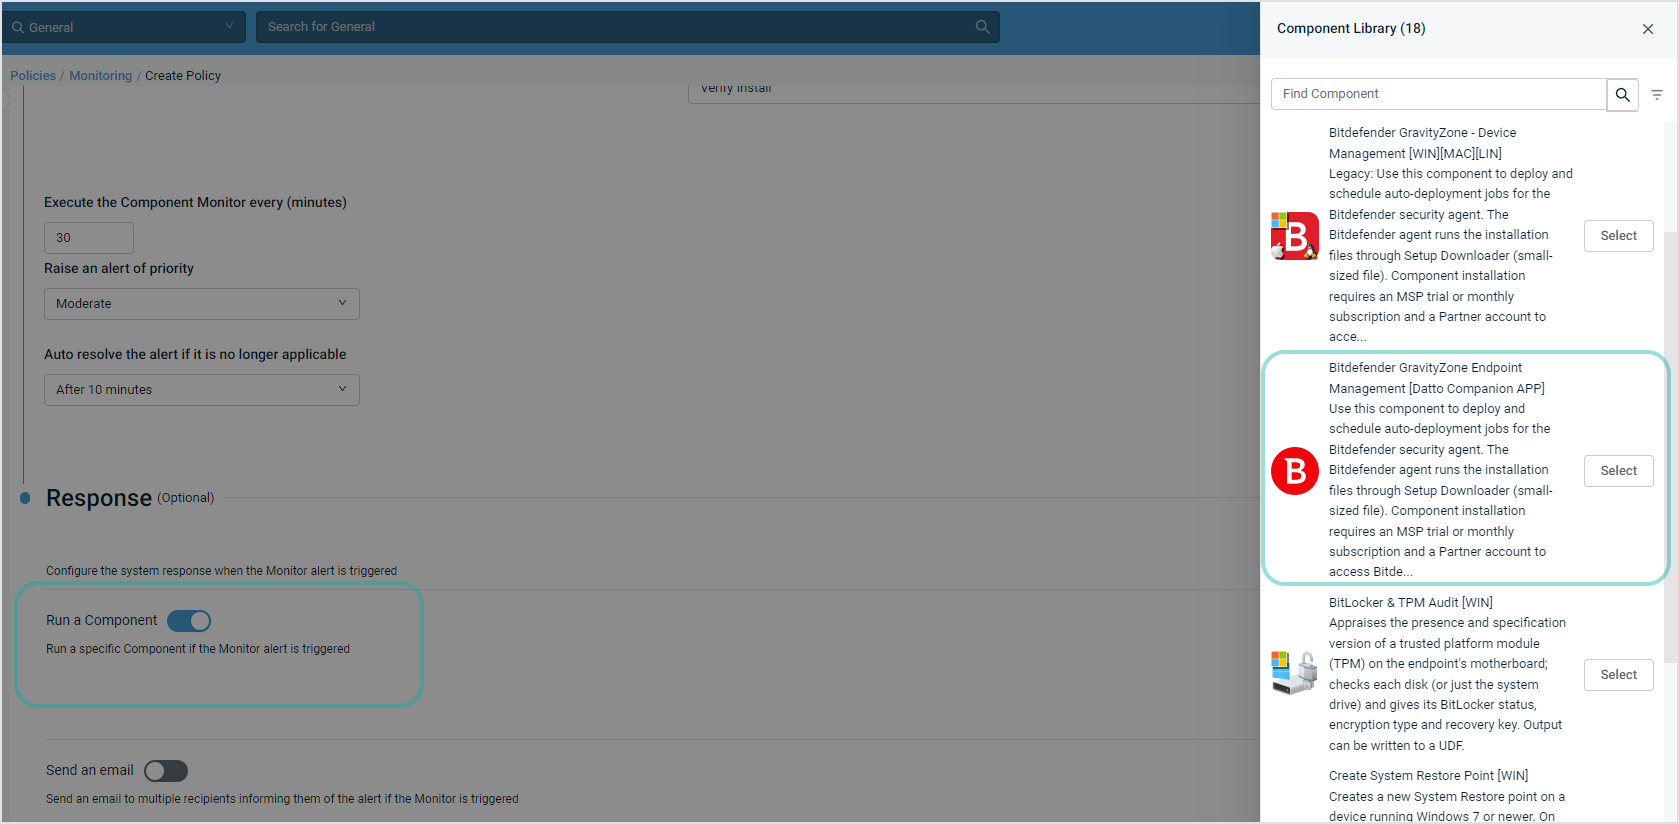
For Action, select one of the options:
Install BEST to deploy the security agent.
Update BEST to update security agent.
Start Full Scan to begin a full scan task on the selected targets.
Start Quick Scan to begin a quick task on the selected targets.
For the Install BEST option, you can configure a custom name for the installation package.
Important
Make sure to match the component action to the monitor action from step 3. For example, Verify Install with Install BEST or Verify Quick Scan with Start Quick Scan.
Configure email recipients to send out notifications when the alert is raised.
Enable Send an email and configure recipients for notifications when the alert is raised.
After you have finished the configuration, click Add Monitor.
Under Targets, click the Add Target button and select one of the categories from the drop-down list:
Device Filters
Device Groups
Site Groups
For information about target categories, refer to Filters and Groups in Datto documentation.
Depending on the category, select the types of devices you are interested in and click Add. You can select multiple types of devices.
For example, under Device Filters, select and add all machines running Windows 10, Windows 11, and Windows Server 2022.
When finished, click X to close the selection list.

Click Enabled to make the policy active.
To apply the policy immediately, click the Save and Deploy Now button.
To only save the policy, click the Save and Deploy Later button.
Editing policies in the old UI
To edit a monitoring policy in the old UI:
Log in to Web Portal.
Click Sites to open the drop-down list.
Go to the Policies tab of your selected site.
Click on the policy name to edit.
You can edit the following elements:
Name
Targets
Monitors
Click Save and Push Changes to save changes and apply the edited monitor policy immediately.
Editing policies in the new UI
To edit a policy in the new UI:
Log in to Web Portal.
Go to Policies > Monitoring and click on the name of the policy you want to edit.
You can edit the following elements:
Name and description
Monitors
Targets
Policy status (enabled or disabled)
To apply the policy immediately, click the Save and Deploy Now button.
To only save the policy, click the Save and Deploy Later button.
To discard the changes, click Cancel.
Configuring policy exclusions in the old UI
You can exclude devices individually from the monitoring policy.
To configure monitoring policy exclusions:
Log in to Web Portal.
Click Sites to open the drop-down list.
Go to the Policies tab of your selected site.
Find your monitor policy under the Site Policies section.
Click
 to view the device list.
Select the All devices filter.
Toggle the active state to exclude a device from the monitor policy.

Note
Your Datto RMM account requires administrator rights to configure policy exclusions.
Configuring policy exclusions in the new UI
To exclude devices in the monitoring policy using the new UI:
Log in to Web Portal.
In the left-side menu, go to Policies > Monitoring.

Select the policy to view its details.
Scroll down to the Disabled Devices area and select it.
Click the Edit button to select devices that you want to exclude.

Note
Your Datto RMM account requires administrator rights to configure policy exclusions.