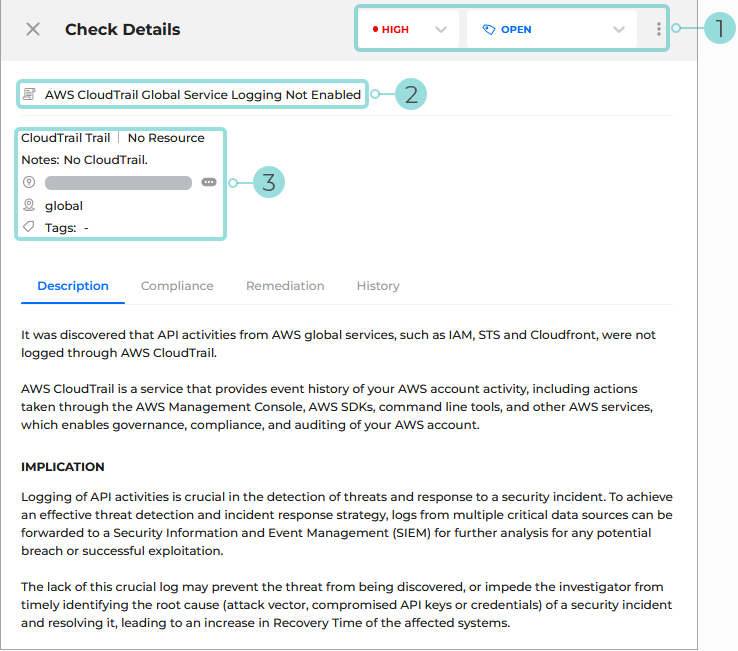
Check details and take action for failed checks
The Check Details panel provides you with additional information on why a specific check failed. You can use this information to identify, prioritize, and take steps to resolve the issue.

Available actions - You can use this section to interact with the failed check:
Change severity - change the severity of the finding:

You can use this option to prioritize remediation and trigger Vulnerability Management.
For more information on severity levels, refer to this KB article.
Change status - change the status of the finding:

The following statuses are available:
Open - The vulnerability is still in place and has not been resolved.
Risk accepted - You have accepted the risk this vulnerability poses but have decided not to take any action.
False positive - The vulnerability does not exist and no action is needed. The check was failed in error.
Important
Changing the status of a finding will also change the status of the check from
FailedtoPassed.Export Issue: Click the Export
 button to export the information in the panel to an issue in Jira.
 If the check has already been exported, clicking the button displays the exported issue.
Rule Title - The title of the rule that was checked and failed, resulting in this finding being created.
Finding details - Basic information regarding the check:

Resource Type - The type of the resource involved in the check.
Resource - The name of the resource being checked.
Click on the name, to go to the cloud console for faster investigation and remediation.
Tip
Hovering over the Details
 button displays the resource ID.
Resource details - This links takes you to the Asset inventory page, where it automatically configures filters to display all the resources related to this finding.
Notes - Provides relevant information regarding the finding.
Account Name - The name of the cloud account that where the check was performed.
Tip
Hovering over the Details
 button displays the account ID.
Region: - The region that the resource involved in the check belongs to.
Tags - Displays a list of tags associated to the finding.
Additional details - Get detailed information to speed up identifying, prioritizing, and fixing issues. The section contains the following tabs:
Description - The description tab shows you details about the rule that was checked and the potential impact of a misconfiguration. The following information is displayed:
Overview - A description of the finding, an explanation, and background information about the check conducted.
Implication - The check’s potential impact if not addressed.
References - Links to articles or other types of resources relevant to the check.
Compliance - View which specific compliance regulations are relevant to that particular check. This tab contains the following information:
Compliance Standard - The specific compliance regulation relevant to that particular check. Clicking the standard name takes you to the full document of the standard (if applicable).
Compliance Controls - A detailed description of any compliance controls that affect the check.
Remediation - Contains a guide on how to fix this check via the cloud console or cloud CLI (if applicable).
History - View all the changes that occurred to a check over a period of time, when an issue was introduced, as well as any past status or severity changes.
The following information is provided:
Date - The date a change was made.
Time - The time a change was made.
Changes - The history of the check across scans.
Notes - Any notes accompanying the modifications.
Here is the list of possible changes:
First check performed - GravityZone Cloud Security Posture Management performs the check for the first time, for example when a new resource is created.
Check now Failing - An existing passing or suppressed check is now failing, for example when someone disables MFA on their account.
Check now Passing - A failing or suppressed check is now passing, this indicates that a misconfiguration has been fixed. For example when a security group’s inbound rules have been tightened to meet best practices.
Check now Suppressed - A user suppresses a failing check through Vulnerability Management. For example, the user accepts the risk of having a storage bucket publicly accessible and marks it as Risk Accepted.
Check no longer performed - The check was no longer performed, usually due to the resource no longer being detected. For example, an unused IAM user has been deleted.
Severity changed by {User} - A user within the organization changed the check’s severity level.
Status changed by {User} - A user within the organization changed the check’s status.