Setting up and configuring a managed company as an MSP Partner
Configure endpoint protection and deploy the security agent
This section provides you with the steps required to deploy security agents on the endpoints of a managed company and customize the level of protection provided for each one by setting up custom installation packages.
Depending on your needs and current network setup, BEST may be deployed in multiple ways.
To deploy endpoints on a managed company's network you will need to prepare an installation package and send it via email to users that will deploy them locally on each endpoint.
Refer to the Installation page for in-depth customization options.
Important
Before you start the installation check the prerequisites outlined in ???.
Log in to GravityZone Control Center.
Go to the Installation packages page from the left side menu.
Click the Create button in the upper-right side of the screen.
Type in the Name and Description for the new installation package.

Scroll down to the Modules section, and select the modules you want to deploy on the endpoints of your managed company.
You can view the products they have assigned by going to Companies, clicking on the company name, and going to the Licensing tab.
You can identify the features they have access to using this feature matrix.
Scroll down to the Additional settings section and make sure the Remove competitors option is unchecked.
Click Save.
Select the newly created package from the list of packages and click Send download links.

Enter the email addresses of the recipients and click Send.
To deploy endpoints on a managed company's network you will first need to create and install a installation package with the Relay role enabled. You will require someone from the target company to download and install the agent on a static endpoint.
Once this is done, you can use the Relay to discover the endpoints from the local network and use installation tasks to deploy BEST on them.
Refer to the Installation page for in-depth customization options.
Important
Before you start the installation check the prerequisites outlined in ???.
To install BEST, follow these steps:
Log in to your GravityZone console with a Partner account.
Go to the Installation Packages page, under Network, from the left side menu.
Click the Create button at the top of the table.
Fill in the information under the General tab:

Scroll down to the Modules section, and select the modules you want to deploy on your managed company's endpoints.
You can view the products they have assigned by going to Companies, clicking on the company name, and going to the Licensing tab.
You can identify the features they have access to using this feature matrix.
Scroll down to the Additional settings section and make sure the Remove competitors option is unchecked.
Under the Roles section, makes sure you enable the Relay setting.
Optional: you can further customize the installation package. Learn more
Scroll down and click the Save button.
Select the newly created package from the list of packages and click Send download links.

Enter the email address of the user that will be deploying the security agent with the Relay role enabled on an endpoint from the company network, and click Send.
Note
Deploying the relay on one endpoint is enough to deploy the security agent on all the other endpoints in your network.
Create a new installation package without enabling the Relay setting (steps 3 to 8).
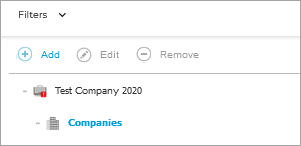
Go to the Network page from the left side menu, and on the right side of the page, navigate to to Companies folder and select it.
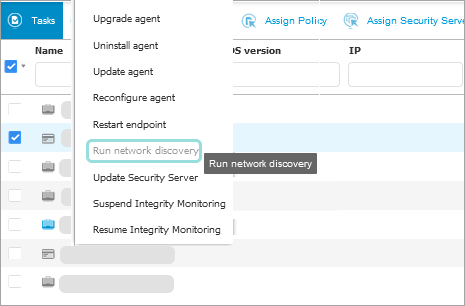
Select the checkbox for the target company, click the Tasks button on the upper side of the screen and select Run network discovery.
For more information on running this task refer to Using actions and How network discovery works.
All endpoints on the company network are now visible in the Network page.
Click on the company name and locate the endpoints where you want to deploy BEST. For more information refer to Viewing endpoint details.
Check the boxes for the endpoints where you want the agent installed.
Click the Tasks button on the upper side of the screen and select Install agent.
Customize the installation and click Save. For more information refer to Run remote installation tasks.
A confirmation message will appear.
Note
You can view and manage the task in the Network > Tasks page.
Creating endpoint tags for managed companies
Note
To use endpoint tags on a managed company it requires the ATS add-on enabled for own use.
Log in to GravityZone Control Center.
Go to the Network page from the left side menu.
Click the Companies folder under the Name column in the right side of the page.
Click the target company name.
Select the target endpoints. You can select one or several endpoints, groups of endpoints, or companies. For more information refer to Viewing endpoint details.
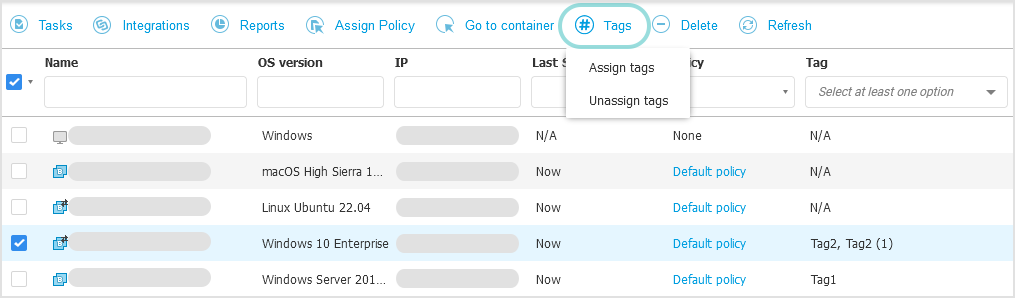
Click the Tags button in the action toolbar and select Assign tags.
Alternately, right-click on the selected targets and choose Tags > Assign tags from the contextual menu.
Use the + Create tag option to create a new tag for all the endpoints managed by your target company that you wish to assign the policy to.

Select the box next to the newly created tag.
Click Assign.
A notification in lower-right side of the console informs you about the assignment process.
Refresh the Network grid to view the changes.
For more information on working with endpoint tags refer to Using endpoint tags.
Configuring policies for managed companies
The above procedure makes use of the default GravityZone policy, which is automatically applied to an endpoint when the BEST agent is deployed.
Some features need to be activated in the policy that is applied to an endpoint. If they are not, the feature will not be active on the endpoint.
We recommend creating a separate policy for each company you manage the security for.
Create a new policy and apply it to all of the company's endpoints. You can also create additional policies to be applied to specific endpoints for that same company.
Create policies for your managed companies
There are two way of managing policies for your child companies:
Create a separate policy for each company. This way you can easily customize, in great detail, the security of each company.
Tip
This method is recommended when managing a small number of companies.
Create a few policies that cover the needs of the main types of companies you manage. You can then apply these policies to groups of companies, and, when needed, copy and customize them for specific cases.
Tip
This method is best used when managing a large number of companies.
Log in to GravityZone Control Center.
Go to the Policies page from the left side menu.
Click the
 Add button at the upper side of the table. This will create a new policy starting from the default policy template.
On the General page, under the Technical Support Information section, type in the contact information for your company so that your customers can contact you whenever they require assistance.
Configure the rest of policy settings. For detailed information, refer to Policy setup.
Important
Make sure you enable all feature included in your subscription. For more information, refer to ???.
Click Save to create the policy and return to the policies list.
You cannot save a policy that contains invalid data. When trying to do so, a specific message appears in lower right-corner of the screen indicating which section has issues. At the moment, the message covers only the Sandbox Analyzer > Endpoint Sensor and Integrity Monitoring > Real Time sections.
Assign policies to managed companies
You can assign a policy to a managed company using one of the following procedures:
Tip
When editing a policy, you can enable the Allow other users to change this policy option under General > Policy details to ensure access to the policy. This will avoid losing access to the policy if the user that created it is no longer available.
Log in to GravityZone Control Center.
Go to the Network page from the left side menu.
Click the Companies folder under the Name column in the right side of the page.
Click the target company name.
Select the target endpoints. You can select one or several endpoints, groups of endpoints, or companies. For more information refer to Viewing endpoint details.
Click the
 Assign Policy button at the upper side of the table, or select the Assign Policy option from the contextual menu.
The Policy Assignment page is displayed:

Check the table with target endpoints. For each endpoint, you can view:
The assigned policy.
The parent group from which the target inherits the policy, if the case.
If the group is enforcing the policy, you can click its name to view the Policy Assignment page with this group as target.
The enforcement status.
This status shows whether the target is forcing policy inheritance or is forced to inherit the policy.
Notice the targets with enforced policy (Is forced status). Their policies cannot be replaced. In such case, a warning message is displayed.
In case of warning, click the Exclude these targets link to continue.
Select the Assign the following policy template option.
Note
You can also use the Inherit from above and use endpoint groups to assign policies. For more information refer to Assigning device policies
Select the policy from the drop-down list.
Optional: Select Force policy inheritance to child groups to achieve the following:
Assign the policy to all descendants of the target groups, with no exception.
Prevent changing it from elsewhere lower in the hierarchy.
A new table displays recursively all affected endpoints and groups of endpoints, together with the policies that will be replaced.
Click Finish to save and apply changes.
Log in to GravityZone Control Center.
Go to the Assignment Rules page from the left side menu.
Click the
Add button at the upper side of the table. Enter a suggestive name and description.
Set the priority of the rule.
The rules are ordered by priority, with the first rule having the highest priority. For example, priority 1 is higher than priority 2. The same priority cannot be set twice.
Select the policy for which you create the tag rule.
In the Tag grid, add the tag you created for this specific company.
Click Save to create the rule.

Note
For more details on creating and assigning tags to endpoints, refer to Using endpoint tags.
Tip
You can also assign policies using user rules, location rules, or integration rules. For more information refer to Assigning local policies.
For a feature to function on an endpoint, it might require multiple conditions to be met. Check the below table to make sure a specific feature is enabled for your endpoints.
The columns present the following information:
Feature - The name of the feature.
Policy activation – Indicates where you can go to check if the feature is activated on any given policy.
Tip
To check what policy is applied on a specific endpoint you can go to the Network page from the left side menu from the left side menu, display the endpoint details, and view the information in the Policy tab.
You can run a Policy Compliance report to view what policies are deployed on a list of selected endpoints.
Modules needed to be deployed on the endpoint – This column specifies if the feature requires any specific module to be deployed on endpoints for the feature to function.
Licensing requirements for monthly subscription users – Indicates if the feature is included in the core protection, or if it requires additional add-ons or services to be enabled for a company.
Additional dependencies – Includes any other requirements that do not fit into the above categories.
Feature | Policy activation | Modules needed to be deployed on the endpoint | Licensing requirements for monthly subscription users | Additional dependencies |
|---|---|---|---|---|
You can enable the feature from the Antimalware > On-access > On-access Scanning setting. | Antimalware | Included in core protection. | The feature provides further functionality that can be enabled from the Antimalware > Settings page, in the the policy applied to the endpoint. | |
You can enable the feature from the Antimalware > Advanced Anti-Exploit > Advanced Anti-Exploit setting. | Advanced Anti-Exploit | Included in core protection. | The feature provides further functionality that can be enabled from the Antimalware > Settings page, in the the policy applied to the endpoint. | |
You can enable the feature from the Antimalware > On-execute > Advanced Threat Control setting. | Advanced Threat Control | Included in core protection. | The feature provides further functionality that can be enabled from the Antimalware > Settings page, in the the policy applied to the endpoint. | |
You can enable the feature from the Incident Sensor > Incident Sensor setting. | EDR Sensor | Requires the EDR add-on to be enabled for the company's own use. | N/A | |
Fileless Attack Protection | You can enable the feature from the Antimalware > On-execute > Fileless Attack Protection setting. | Antimalware | Requires the Advanced Threat Security add-on to be enabled for the company's own use. | The feature provides further functionality that can be enabled from the following settings in the the policy applied to the endpoint.
|
You can enable the feature from the Firewall > Firewall setting. NoteIf using an installation package created prior to the release of the Firewall feature on Windows Servers, activating the feature in the applied policy will have no effect on the endpoint. | Firewall | Included in core protection. | N/A | |
You can enable the feature from the Antimalware > Hyper Detect > Hyper Detect setting. | Antimalware | Requires the Advanced Threat Security and HyperDetect add-ons to be enabled for the company's own use. | N/A | |
You can enable the feature from the Network Protection > General > Network Protection setting. | Network Protection > Network Attack Defense | Included in core protection. | N/A | |
You can enable the feature from the Incident Sensor > Incident Sensor setting. | EDR Sensor | Requires the eXtended Detection and Response add-on and at least one of the sensor add-ons needs to be enabled for the company. |
| |
You can enable the feature from the Network Protection > General > Network Protection setting. | Network Protection > Content Control | Included in core protection. | The feature provides additional functionality that you can enable and configure from the Network Protection > Content Control policy page. | |
You can enable the feature from the Device Control > Device Control setting. | Device Control | Included in core protection. | N/A | |
You can enable the feature from the Risk Management > Risk Management setting. | This feature requires BEST to be installed on endpoints, but does not require any particular module to be deployed. | Included in core protection. | N/A | |
You can enable the feature from the Encryption > General > Encryption Management page. | Encryption | Requires the Full Disk Encryption add-on to be enabled for the company. | N/A | |
You can enable the feature from the Integrity Monitoring > Real time > Enable real-time monitoring setting. | Integrity Monitoring | Requires the Integrity Monitoring add-on to be enabled for the company. | Requires a rule set to be created and added to the applied policy. | |
This feature does not require policy activation. | Patch Management | Requires the Patch Management add-on to be enabled for the company. | Requires maintenance windows to be created from the Policies > Configuration Profiles page and assigned to the policy installed on the endpoint.. | |
This feature does not require policy activation. | Exchange protection | Requires the Security for Exchange add-on to be enabled for the company. | Requires User Groups to be created and configured for the policy. | |
Sandbox Analyzer - console submissions | This feature does not require policy activation. | This feature works independently of endpoints. | Requires the Advanced Threat Security > Sandbox Analyzer add-on to be enabled for the company. | N/A |
Sandbox Analyzer - endpoint submissions | You can enable the feature from the Sandbox Analyzer > Endpoint Sensor section, by selecting the Automatic sample submission from managed endpoints check box. | This feature requires the BEST agent to be installed on an endpoint, but does not require any specific module to be deployed. | Requires the Advanced Threat Security > Sandbox Analyzer add-on to be enabled for the company. | N/A |
This feature does not require policy activation. | This feature works independently of endpoints. | Requires the Email Security add-on to be enabled for the company. | N/A | |
GravityZone Security for Containers | This feature does not require policy activation. |
| Requires the Container Protection add-on to be enabled for the company. | Requires the following options to be enabled in the policy applied to the endpoint:
|
This feature does not require policy activation. | This feature only works with mobile devices, which use the Bitdefender GravityZone MTD agent. | Requires the Mobile Security add-on to be enabled for the company. | N/A | |
Ransomware Mitigation | You can enable the feature from the Antimalware > On-Execute > Ransomware Mitigation setting. |
| Included in core protection. |
|
Web Traffic Scan | You can enable the feature from the Network Protection > Web Protection > Web Traffic Scan setting. | Network Protection > Web Traffic Scan | Included in core protection. | Requires the following option to be enabled in the policy applied to the endpoint: Network Protection > General > Intercept Encrypted Traffic & Scan HTTPS. |
Setting up GravityZone user accounts for managed companies
Depending on the need of the managed company, you might need to create multiple accounts for it's users. Each account can be give access to a number of feature and products, depending on the role of the user in the company.
For more information, refer to:
User roles, for a list of all possible user roles. These include a list of pre-defined user permissions, with custom tailored rights build around traditional company roles, and the Custom role, which can be manually configured with specific user rights.
User rights, for a complete list of user rights. This information will help you better understand the rights that can be given to a specific user, and are helpful in manually customizing a specific user's rights.
Creating a new user
To add a user account in Control Center, follow the steps below:
Log in to the GravityZone console with a Partner account.
Go to the Accounts page from the left side menu.
Click the Add account button in the upper left side of the page.
A configuration window will be displayed.
Under the Details section, fill in the following details:
Email - the user's email address used to log in to Control Center.
Note
The email address must be unique.
Reports and important security notifications are sent to this address. Email notifications are sent automatically whenever important risk conditions are detected in the network.
Full name - the full name of the account owner.
Company - select the company you want the user to belong to.
Timezone - select the timezone of the account. The console will display time information according to the selected timezone.
Language - select the console display language.

Configure the policy settings under the Login Security section:
Set maximum password age to 90 days - enable or disable the password expiration policy.
When enabled, the password associated to the account expires 90 days after it is created. The user needs to change the password before this time passes, or they will be locked out of GravityZone.
Lockout accounts after 5 login attempts with invalid passwords - when enabled, locks the account after 5 login attempts are made using an incorrect password.

Note
If an account is locked, the user will have to reset their password. Alternatively, this action can also be taken by an administrator.
Under the Role privileges section, configure the following settings:
Tip
If you are creating a user for a company that wants to run their own reports, select the Security Analyst role and make sure you select the company name from the Companies field.
Role - select the role you want to assign to the user. The role determines what rights the user will have.
Note
For more information on user roles, refer to User Roles.
Rights - select what rights you want the user to have.
Each user role has a predefined configuration of rights. You can assign the user a specific combination of rights by selecting Custom under Role.
Note
For more information on user rights, refer to User rights.

Under Select targets, select the companies and network groups the user will have access to. You can restrict user access to specific network areas or to specific companies.

Click Create to add the user.
Note
Control Center automatically sends the user an email with login details and a link they can use to create a password for their account.
You can change the password after the account has been created. Click the account name in the Accounts page to edit its password. Once the password has been modified, the user is immediately notified via email.
Users can change their login password from Control Center, accessing the My account page.
The new account will appear in the user accounts list.

Deleting a user
Important
When deleting a user, all associated policies, installation packages, generated API keys and scheduled reports are also deleted.
Check that you have copies or are no longer using these resources before deleting a user.
Log in to the GravityZone console with a Partner account.
Go to the Accounts page from the left side menu.
Select the company the user belongs to using the Company filter above the main grid.
Select the users you want to delete.
Click Delete.