General
In Exchange Protection > General section of the policy, you can create and manage groups of email accounts, define the age of the quarantined items and ban specific senders.
User groups
Control Center allows creating user groups to apply different scanning and filtering policies to different user categories. For example, you can create appropriate policies for the IT department, for the sales team or for the managers of your company.
The user groups are available at the company level, regardless of the policy or the user that created them.

To create a user group:
Click the Add button at the upper side of the table. The details windows is displayed.
Enter the group name, description and the users' email addresses.
Note
For a large list of email addresses, you can copy and paste the list from a text file.
Accepted list separators: space, comma, semicolon and enter.
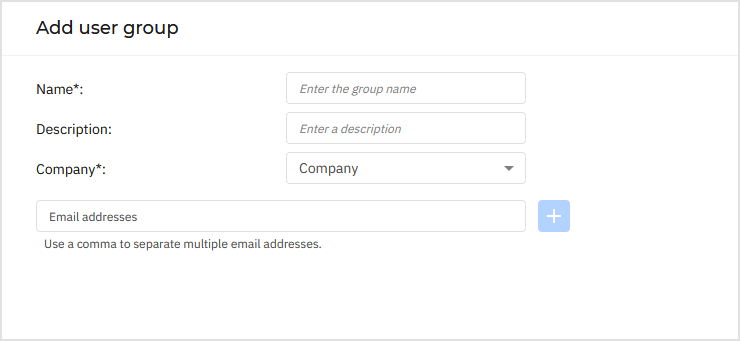
Click Add.
Custom groups are editable. Click the group name to open the configuration window where and you can change the group details or edit the users list.
To remove a custom group from the list, select the group and click the Delete button at the upper side of the table.
Settings
Delete quarantined files older than (days) - By default, quarantined files older than 15 days are automatically deleted. If you want to change this interval, enter a different value in the corresponding field.
Connection blacklist - With this option enabled, Exchange Server rejects all emails from the blacklisted senders.
To build a blacklist:
Click the toggle to enable Connection blacklist.
Enter the email addresses you want to block.
You can use the following wildcards to define an entire email domain or a pattern for email addresses:
Asterisk (*), replacing zero, one or more characters.
Question mark (?), replacing any single character.
For example, if you enter
*@boohouse.com, all email addresses fromboohouse.comwill be blocked.Click the + (plus) button to add the email addresses to the list.
To copy the email addresses, click the Copy to clipboard icon.
To delete an address, click the corresponding X button. To delete all addresses, click Clear list.
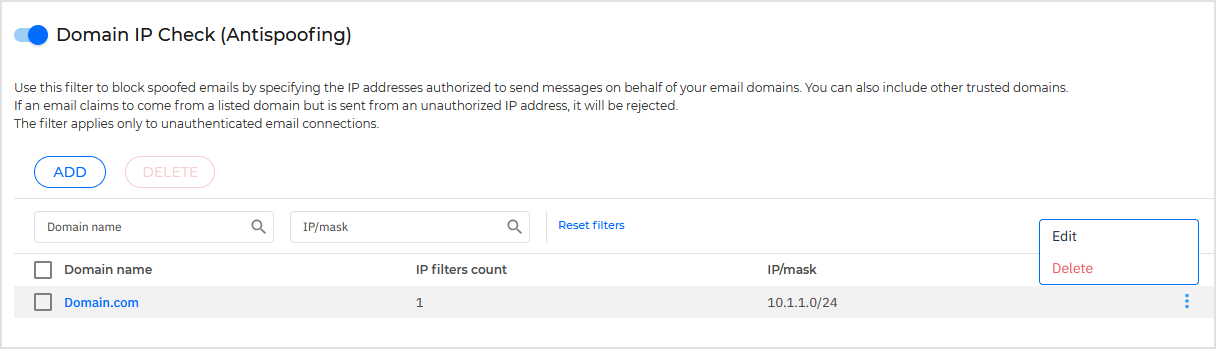
Domain IP Check (Antispoofing)
Use this filter to prevent spammers from spoofing the sender's email address and making the email appear as being sent by someone trusted.
You can specify the IP addresses authorized to send email for your email domains and, if needed, for other known email domains. If an email appears to be from a listed domain, but the sender's IP address does not match one of the specified IP addresses, the email is rejected.
Warning
Do not use this filter if you are using a smart host, a hosted email filtering service or gateway email filtering solution in front of your Exchange servers.
Important
The filter only checks unauthenticated email connections.
Best practices:
It is recommended to use this filter only on Exchange Servers that are directly facing the Internet. For example, if you have both Edge Transport and Hub Transport servers, configure this filter only on the Edge servers.
Add to your domains list all internal IP addresses allowed to send email over unauthenticated SMTP connections. These might include automated notification systems, network equipment such as printers, etc.
In an Exchange setup using Database Availability Groups, also add to your domains list the IP addresses of all your Hub Transport and Mailbox servers.
Use caution if you want to configure authorized IP addresses for specific external email domains that are not under your management. If you do not manage to keep the IP address list up-to-date, email messages from those domains will be rejected. If you are using an MX backup, you must add to all external email domains configured the IP addresses from which MX backup forwards email messages to your primary mail server.
To configure antispoofing filtering, follow the steps described herein:
Click the toggle to enable Domain IP Check (Antispoofing).
Click the Add button at the upper side of the table.
On the configuration page, enter the email domain in the corresponding field in the format
www.domain.comordomain.com.Provide the range of authorized IP addresses to be used with the previously specified domain, using the CIDR format (IP/Network mask). For example:
10.1.1.0/24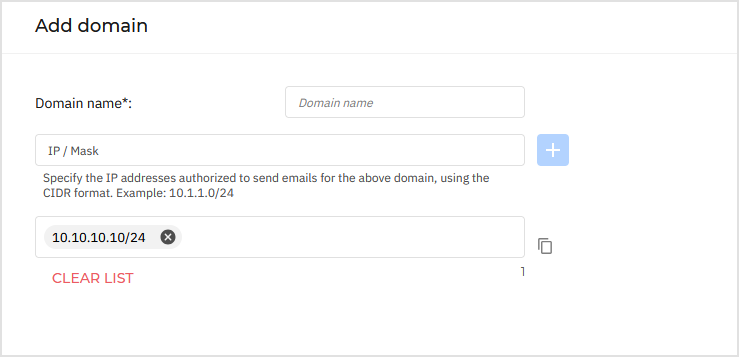
Click the + (plus) button. The IP addresses are added to the list.
To copy the IP addresses, click Copy to clipboard icon.
To delete an IP range from the list, click the corresponding X button. To delete all the IP addresses, click Clear list.
Click Add.
The domain is added to the filter.
To edit a domain, click its name in the table or click the  More menu and select Edit.
To delete an email domain from the filter, select it in the table and click the Delete button, or open the More menu in the table and select Delete.