Using the Power User module
Overview
Enabling the Power User module in BEST allows you to use it for troubleshooting purposes.
The Power User module requires a password to successfully send specific commands. However, a password is not required to interact with the GravityZone Control Center, to query the status of features or other generic commands.
Note
Starting with version 7.9.13.423, the Power User GUI module is available only for endpoints that use Windows 10 and higher and Windows Server 2016 and higher.
Power User CLI
Starting with BEST version 7.9.9.367, the Power User module will also be available through the Command Line Interface (CLI).
This change brings the following improvements:
Reduces the disk size of the installed product.
Eliminates the Chromium dependency.
Updates and maintains Power User settings with the latest features available in GravityZone.
Important
The new Power User CLI module will replace the current Power User GUI version starting with a future release of BEST. The Power User GUI module will remain functional and unchanged until then.
Starting with BEST version 7.9.10.387, the CLI version of the module is now the default option when selecting Power User from the system tray. The GUI version can still be accessed through the EPPowerConsole.exe file.
Power User CLI changes
The following table lists the differences between the GUI and CLI versions of the Power User module:
Current functionalities that will be discontinued | New functionalities available with the CLI version |
|---|---|
Some functionalities of the product features handled by Power User can no longer be modified using the CLI version:
| Power User is now available for ARM64 architecture processors. |
Power User exclusively disables or enables features, and queries their current status. | |
The following features can now be enabled or disabled:
| |
You can add or remove exclusions for the following features:
|
Note
Power User CLI can be installed, enabled, managed and changes can be reverted just like the GUI version. To access and to use the CLI version, refer to Access Power User and Power User CLI commands.
Install Power User
The default installation kit does not include the Power User module. You need to configure the installation package and add the module to it.
New Installation
To install BEST along with the Power User module, follow these steps:
To configure the packages, you must:
Log in to GravityZone Control Center.
Go to the Network page from the left side menu and click on the Packages section.
Click the Add button. A configuration window is doing to be displayed.
Complete the fields with the necessary information.
Select Power User along with all other modules that you want to install.
Save your changes.
Install BEST locally or remotely:
Once you have created the package you can download and run it on your endpoint, or you can install BEST remotely. For more information about this, refer to Install security agents - standard procedure.
Existing Installation
To add the Power User module when BEST is installed on the endpoint, follow these steps:
Log in to the GravityZone Control Center.
Go to the Network page from the left side menu.
Select the group that you want from the left-side pane. All endpoints from the selected container are displayed in the right-side table.
Select the endpoints where you want to install the module.
Right-click on the endpoint or group of endpoints, and go to Tasks > Reconfigure agent.

Select Power User and any other modules you want to install.
Note
For more information on using the Reconfigure agent task, refer to Reconfigure agent.
Click Save.
Enable Power User
Once the module is installed on the machine, follow these steps:
Log in to GravityZone Control Center.
Go to the Policies page from the left side menu.
Select the applied policy or the one that you want to apply on your endpoints.
Go to General and click Settings.
Select the Power User check box.
Set a password.
Click the Save button.
Apply the policy, if it was not applied previously.

Access Power User
To access the Power User CLI module, follow these steps:
Right-click the BEST system tray icon.

Select Power User from the contextual menu.
Run any of the commands listed in the Power User CLI commands section. Some commands may require the Power User password.
To access the Power User GUI module, follow these steps:
Go to
c:\Program Files\Bitdefender\Endpoint Securityor to the folder where BEST was installed.Find and double-click the
EPPowerConsoleexecutable.Enter the password in the login window. The Power User window is displayed. Here you can view the policy settings.
Modify the policy settings you are interested in. For more information, refer to Security management.
You can also use Command Prompt or Power Shell to access the Power User CLI module. For more information about this, refer to Individual Power User commands.
Manage Power User
To easily find endpoints with policies modified using the Power User mode, use one of the methods below:
Apply filters
Log in to the GravityZone Control Center.
Go to the Network page from the left side menu.
Go to Filters menu and click the Policy section.
Select the Edited by Power User option.
Save your changes.
Check the endpoint
Log in to the GravityZone Control Center.
Go to the Network page from the left side menu.
Click the endpoint you are interested in.
In the Information window, click the Policy section.
If you have modified the policy in Power User mode, a notification is displayed.
Revert the changes made with Power User
To revert the changes made in Power User mode, use one of the following:
Save the applied policy again
Log in to the GravityZone Control Center.
Go to the Policies page from the left side menu.
Open the policy template assigned to the endpoint with Power User rights.
Click Save.
The original settings are reapplied to the target endpoint.
Assign a new policy
Log in to the GravityZone Control Center.
Go to the Network page from the left side menu.
Right-click the endpoint with Power User rights.
Select the Assign Policy option.
Select a different policy.
Click the Finish button.
Reset settings from BEST interface
Right-click the system tray icon of BEST and select Power User.
Log in to the Power User console.
Click Reset.
Use the Power User CLI module
The Power User module is now managed using the Product Console. All commands are available only for installed features and can be executed the following way:
Using an interactive Product Console session.
Using individual commands.
Interactive Product Console session
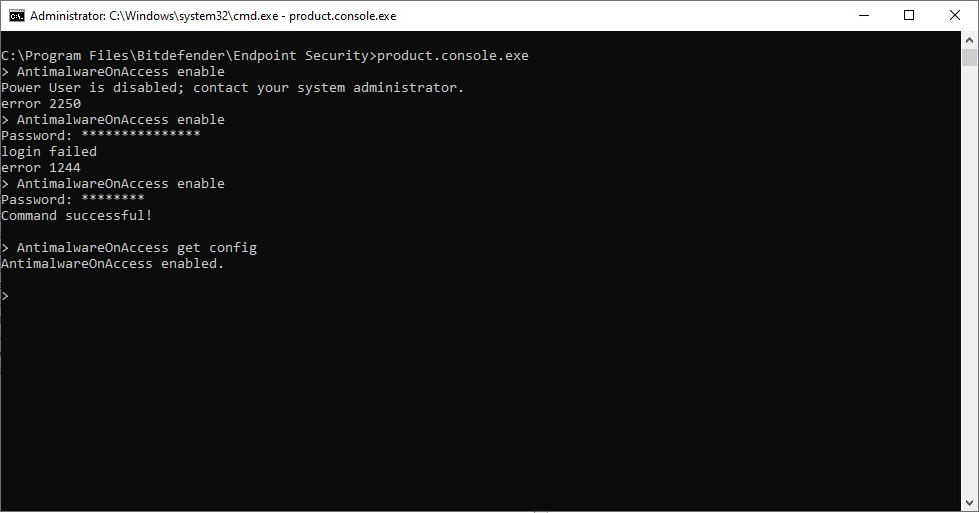
A Product Console interactive session can be started by launching a Product Console session without any arguments. During the interactive session, the Power User module can receive and process as many commands as you want.
During an interactive session, you will be prompted to enter the Power Userpassword only one time. All commands used afterwards will not require a password.
If the password you have entered is incorrect, the command will not to be executed. If 5 consecutive incorrect passwords are entered, there will be a timeout of 5 minutes in which no commands can be executed.
Note
If the Power User password is changed during an interactive session, the new password will be requested for the next command.
Individual Power User commands
Any Power User command can also be individually sent as an argument to the Product Console session, using Command Prompt or Power Shell.
Note
Power User CLI commands are not case-sensitive.
The syntax is as follows:
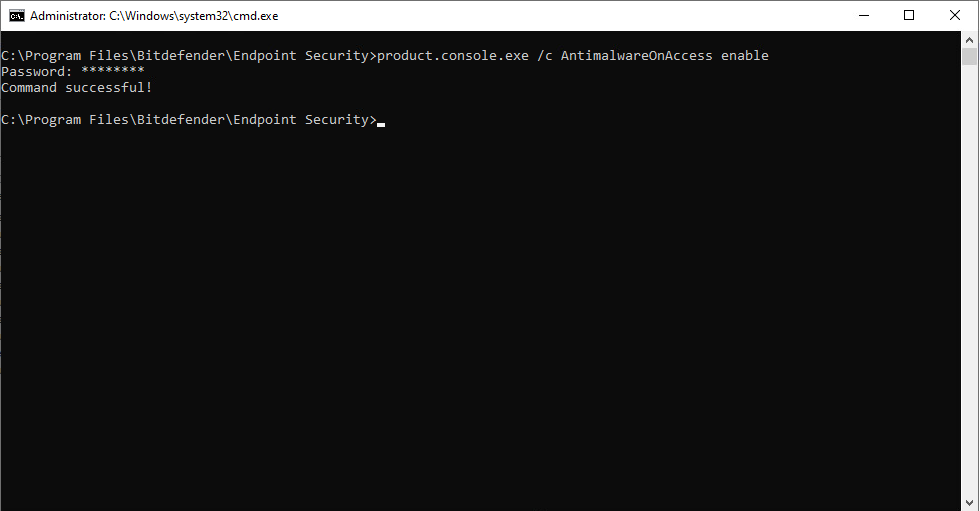
product.console.exe /c <PowerUser command>
You will be prompted to enter the Power User password and the Product Console is going to perform the command only if the password is correct. The Product Console session will be terminated once the command is executed, regardless of its outcome.
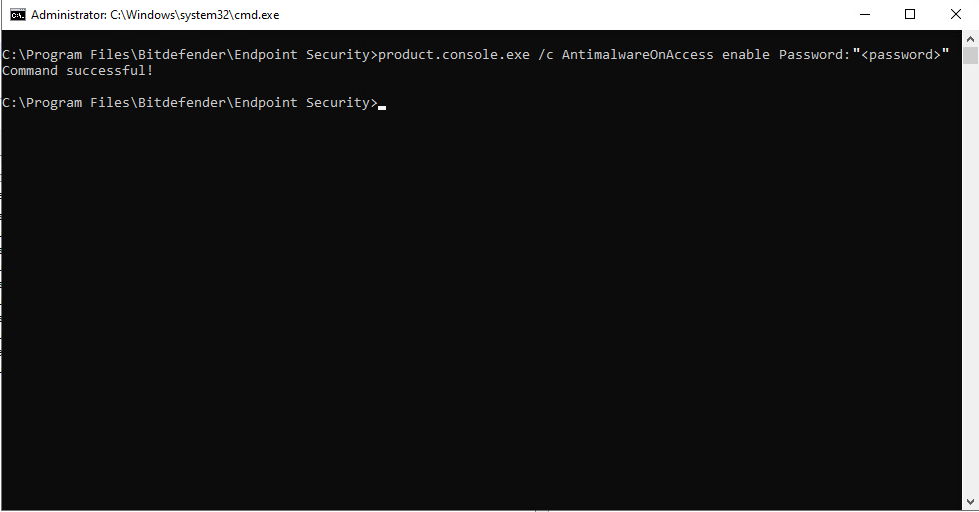
You can also send the password as an additional argument, using the following syntax:
product.console.exe /c <PowerUser command> Password: "<password>"
Note
Make sure that the password is set in quotation marks.
Power User CLI commands
Note
Power User CLI commands are not case-sensitive.
PowerUser help
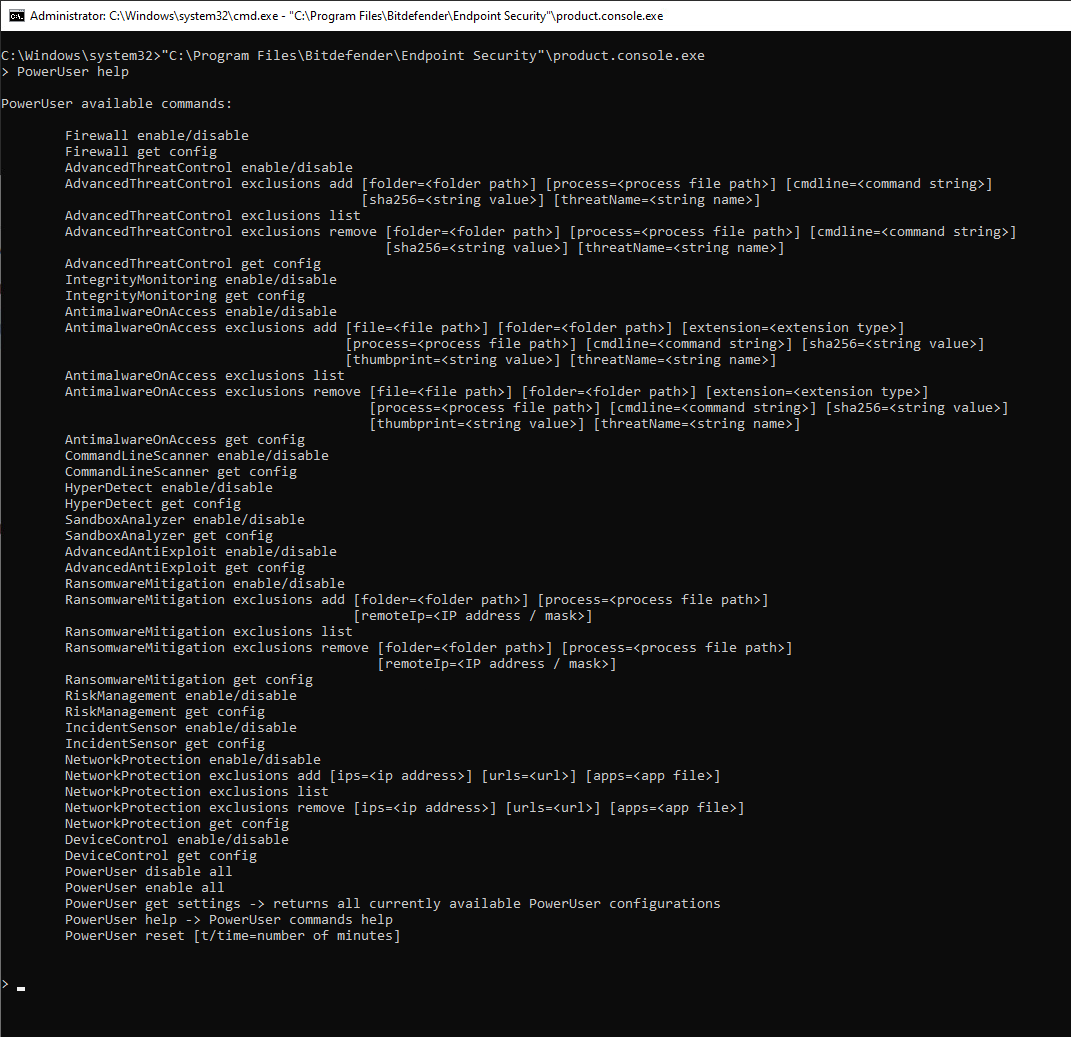
This command lists all the available Power User commands based on your installed features.
Note
You can enable, disable or query Network Protection, if you have at least one feature installed from the Network Protection suite.
<Feature> enable or <Feature> disable
These commands either enable or disable the selected feature.
PowerUser enable all or PowerUser disable all
These commands enable or disable all features that can be modified in Power User.
PowerUser reset, PowerUser reset t, and PowerUser reset time
This command resets all changes performed through the Power User module by re-applying the most recent GravityZone policy.
The t or time optional parameters are used to set the the number of minutes until the policy is reapplied.
For example, if you want Power User to reset after 10 minutes, you muse use the following command: PowerUser reset t=10
<Feature> get config
This command showcases the status of the selected feature.
Note
This command will display statuses only for installed features.
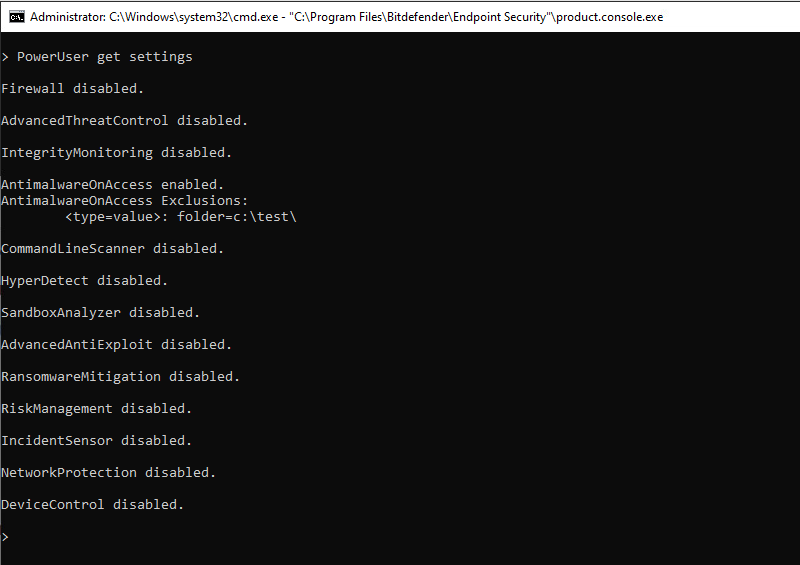
PowerUser get settings
This command returns an overview of all available features, along with their statuses and exclusions (if available).
Advanced Threat Control exclusions
The following commands can be used for ATC exclusions:
AdvancedThreatControl exclusions listAdvancedThreatControl exclusions add [folder=<folder path>] [process=<process file path>] [cmdline=<command string>] [sha256=<string value>] [threatName=<string name>]AdvancedThreatControl exclusions remove [folder=<folder path>] [process=<process file path>] [cmdline=<command string>] [sha256=<string value>] [threatName=<string name>]
Note
You can only add or remove one exclusion per command. You can also select and copy the exclusions found in Power User and paste them into the add or remove commands.
Antimalware On-access exclusions
The following commands can be used for Antimalware On-access scan exclusions:
AntimalwareOnAccess exclusions listAntimalwareOnAccess exclusions add [file=<file path>] [folder=<folder path>] [extension=<extension type>] [process=<process file path>] [cmdline=<command string>] [sha256=<string value>] [thumbprint=<string value>] [threatName=<string name>]AntimalwareOnAccess exclusions remove [file=<file path>] [folder=<folder path>] [extension=<extension type>] [process=<process file path>] [cmdline=<command string>] [sha256=<string value>] [thumbprint=<string value>] [threatName=<string name>]
Note
You can only add or remove one exclusion per command. You can also select and copy the exclusions found in Power User and paste them into the add or remove commands.
Ransomware Mitigation exclusions
The following commands can be used for Ransomware Mitigation exclusions:
RansomwareMitigations exclusions listRansomwareMitigations exclusions add [folder=<folder path>] [process=<process file path>] [remoteIP=<IP address or IP address/mask>]RansomwareMitigations exclusions remove [folder=<folder path>] [process=<process file path>] [remoteIP=<IP address or IP address/mask>]
Note
You can only add or remove one exclusion per command. You can also select and copy the exclusions found in Power User and paste them into the add or remove commands.
Network Protection exclusions
The following commands can be used for Network Protection exclusions:
NetworkProtection exclusions listNetworkProtection exclusions add [ips=<ip address>] [urls=<url>] [apps=<app file>]NetworkProtection exclusions remove[ips=<ip adderss>] [urls=<url>] [apps=<app file>]
Note
You can only set one value per exclusion and one exclusion per command. You can also select and copy the exclusions found in Power User and paste them into the add or remove commands.
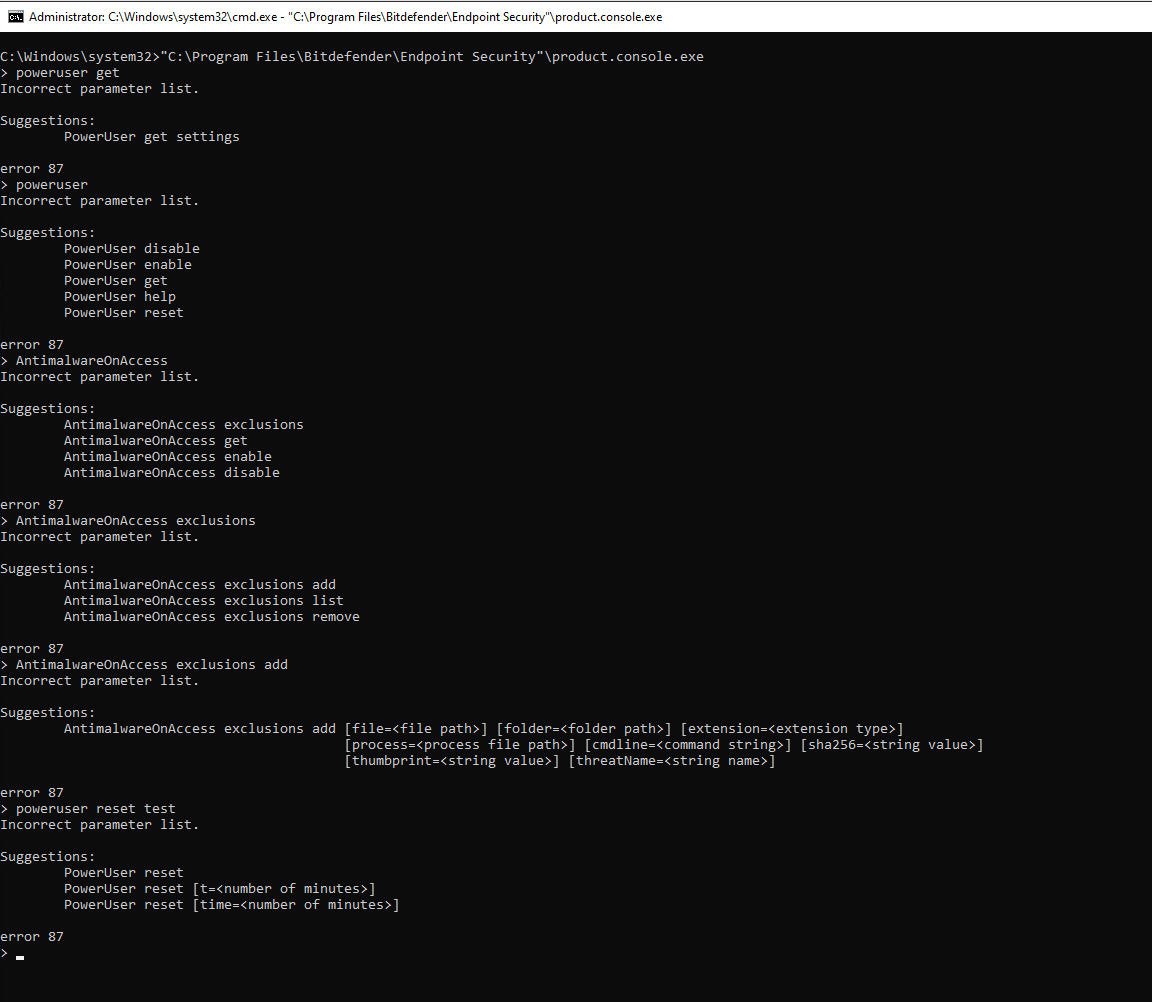
Power User suggestions
The module also offers suggestions when a command is incorrect or incomplete.
Note
Your insights and suggestions play an important role in helping us enhance and refine the new Power User CLI module. Let us know what you think.